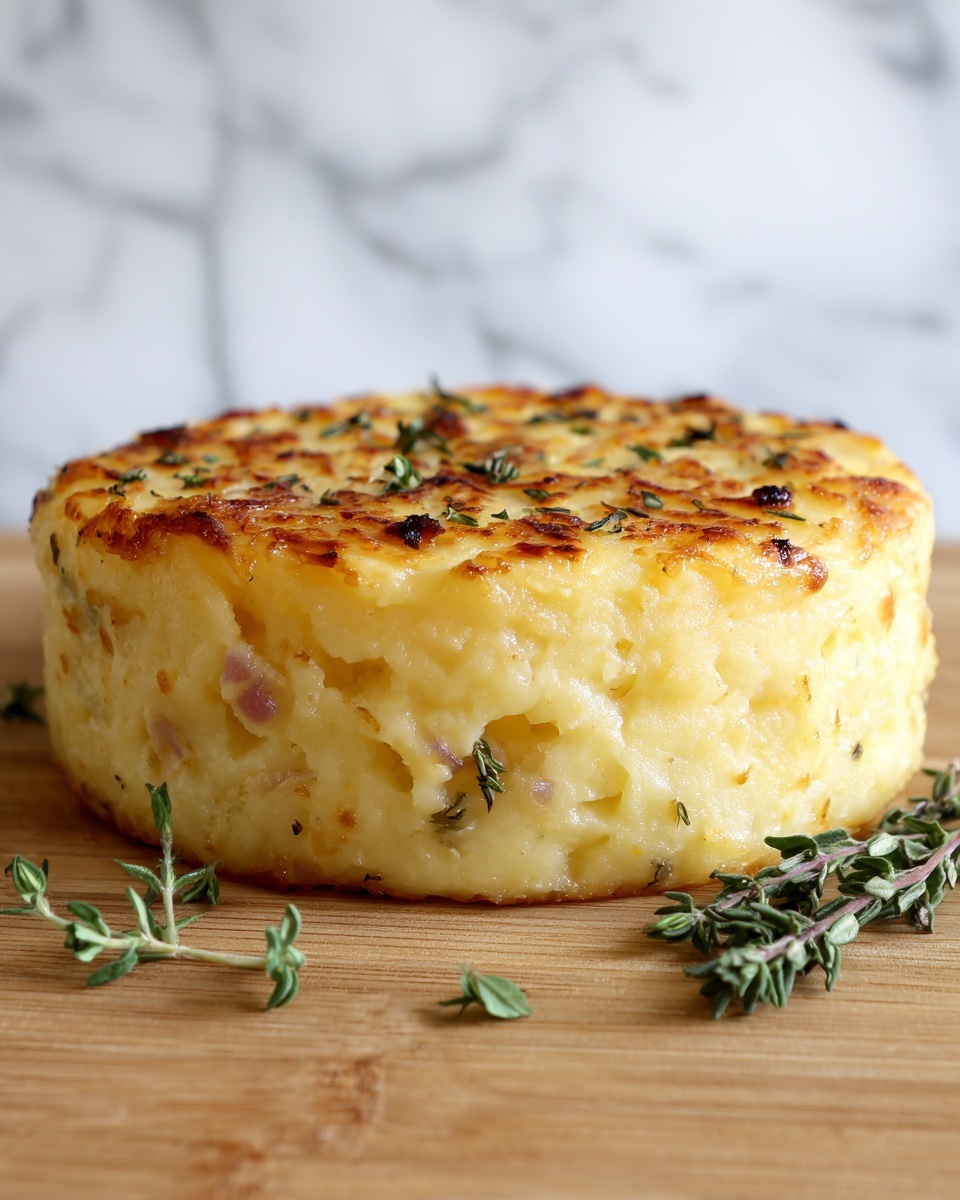
If you are searching for a dish that feels like a warm hug on a plate, look no further than this amazing Stuffed Mashed Potato Nests Recipe. These little nests are the perfect combination of creamy mashed potatoes, melty cheese, and crispy edges that come together in perfect harmony. They are ideal for everything from an impressive side dish at a family dinner to a crowd-pleasing appetizer at your next gathering. The crispy golden exterior paired with the soft, cheesy filling inside will have everyone asking for seconds—and trust me, they deserve it!
Ingredients You’ll Need
The simplicity of the ingredients in this recipe is what truly elevates the flavor and makes the cooking experience delightful. Each component plays a special role in building layers of texture and taste, from creamy richness to a light crunchy bite.
- 4 large russet potatoes, peeled and cubed: These starchy potatoes mash beautifully creamy yet hold their shape when baked.
- 1/2 cup milk: Adds smoothness and moisture, making the mash luscious and velvety.
- 4 tablespoons unsalted butter: Boosts flavor and creates a silky mouthfeel.
- Salt and pepper to taste: Essential seasonings that make every bite balanced and flavorful.
- 1/2 cup shredded cheddar cheese: Provides a sharp, melty element that makes each nest irresistible.
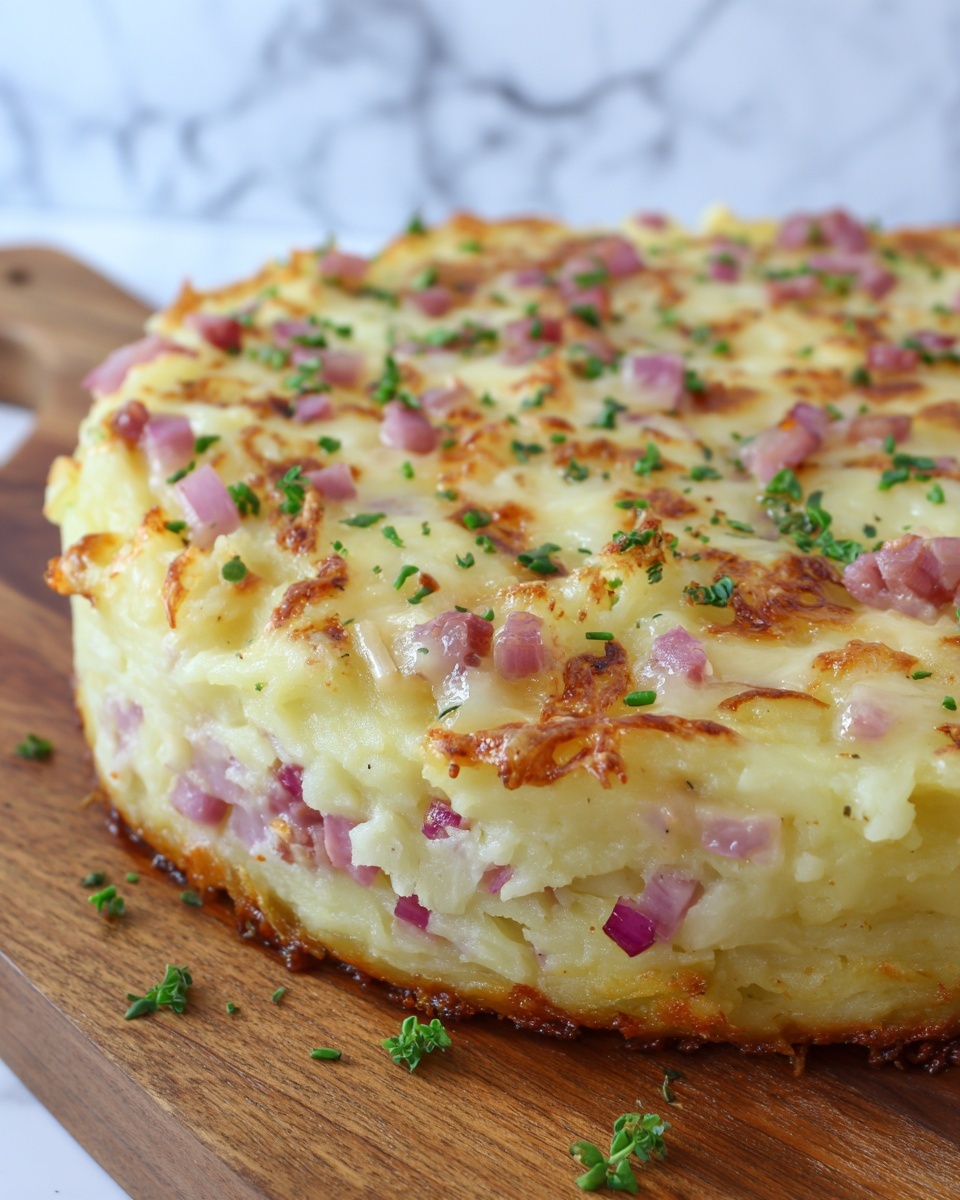
- 1/4 cup cooked bacon, crumbled (optional): Adds a smoky, savory crunch for those who want an extra punch.
- 1/4 cup green onions, chopped (optional): Brings a fresh, mild bite that brightens the dish.
- 1/4 cup sour cream (optional): Infuses a subtle tang and creaminess into the mash.
- 1 tablespoon olive oil: Helps create that golden, crispy exterior when baked.
- 1/2 cup panko breadcrumbs (optional for topping): Introduces a delightful crunch on top.
- 1/4 cup fresh parsley, chopped (optional, for garnish): Adds a pop of color and fresh herbal notes to finish.
How to Make Stuffed Mashed Potato Nests Recipe
Step 1: Preparing the Oven and Potatoes
Start by preheating your oven to 375°F (190°C) and lightly greasing a muffin tin. This little step ensures that your potatoes won’t stick, making the nests easy to remove and serve later. Boil the peeled and cubed potatoes in salted water until fork-tender, about 10 to 15 minutes, which sets the foundation for perfectly creamy mashed potatoes.
Step 2: Mashing Potatoes to Perfection
After draining, return the potatoes to the pot and mash them until silky smooth. Slowly add milk and butter, continuously mashing to create that luscious, smooth texture that makes these nests so special. Season generously with salt and pepper, because seasoning is where the flavor magic truly begins.
Step 3: Mixing in Cheese and Fillings
Now it’s time to stir in shredded cheddar cheese, which will melt beautifully inside the nests, adding gooey, cheesy goodness. If you’re opting for extra flavor, mix in crumbled cooked bacon, chopped green onions, or sour cream at this stage to tailor the nests to your liking.
Step 4: Forming the Potato Nests
The fun part is shaping the nests. Scoop generous portions of mashed potato into each muffin cup and press down slightly to create a “nest” shape with a hollow center. Ensure the edges are a bit thicker to hold any fillings and keep their structure during baking—this way, each nest is a perfect little vessel for melted fillings.
Step 5: Adding Crunch and Baking
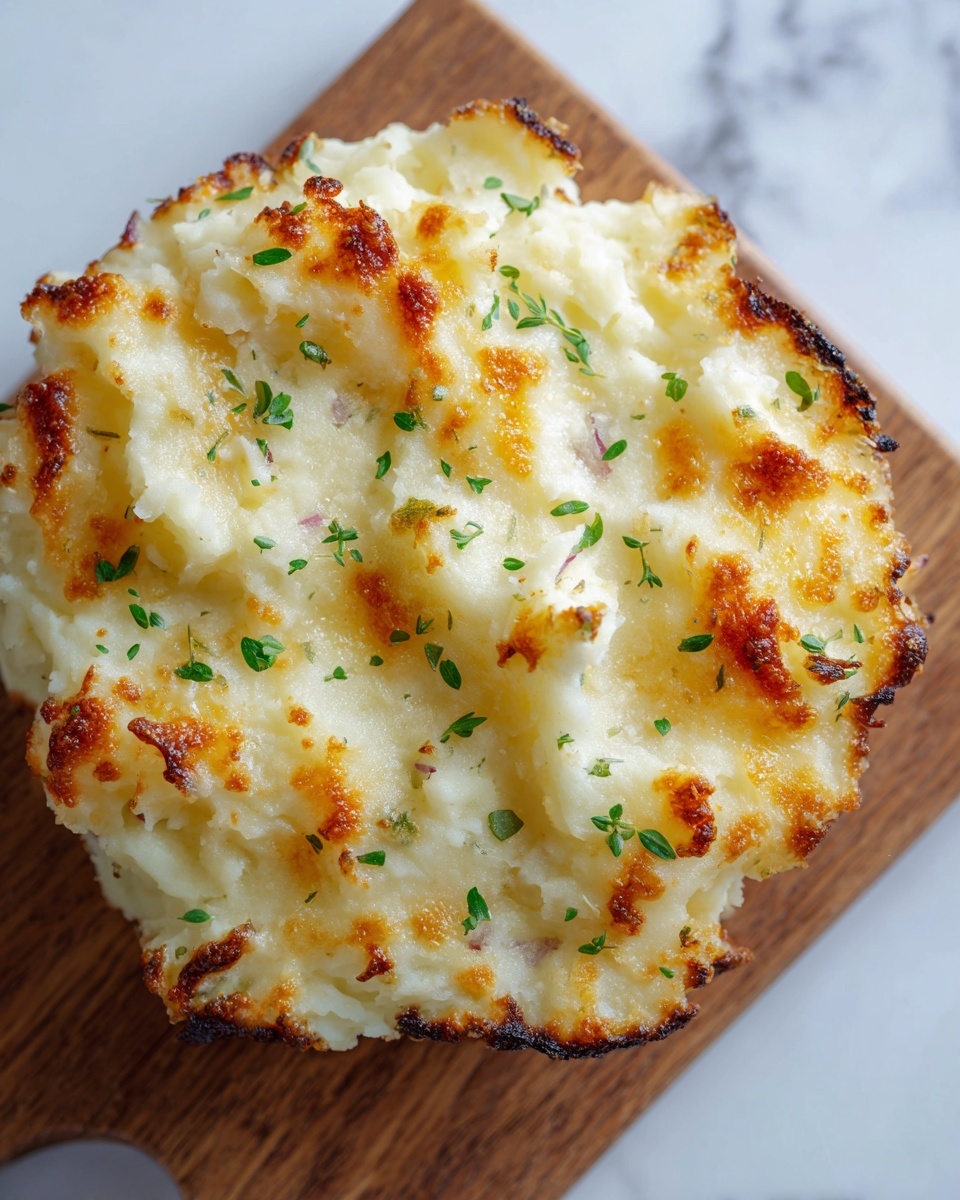
If you want a crunchy topping, sprinkle panko breadcrumbs over each nest now. Drizzle a touch of olive oil on top to encourage golden browning and bake the nests for 15 to 20 minutes. When out of the oven, you’ll notice the edges are crisp and inviting, while the insides remain soft and cheesy.
Step 6: Serving Your Creation
After a few minutes of cooling, gently pop your nests out of the tin and garnish with chopped fresh parsley for a burst of color and fresh flavor. Serve warm and watch how quickly these delightful stuffed mashed potato nests vanish from the plate!
How to Serve Stuffed Mashed Potato Nests Recipe
Garnishes
A sprinkle of fresh parsley adds not only vibrant color but also a refreshing herbal note that elevates the palate. Consider a light dusting of smoked paprika or a dollop of sour cream to bring another dimension of flavor and a touch of creaminess that complements the cheese and potatoes perfectly.
Side Dishes
These potato nests work splendidly alongside roasted vegetables, a crisp green salad, or your favorite protein like grilled chicken or steak. Because they’re so rich and filling, pairing them with lighter, fresh sides balances the meal wonderfully.
Creative Ways to Present
You can get playful by serving these nests as individual bites on a platter with toothpicks for parties or arranging them around a bowl of warm gravy for dipping. They also make a gorgeous brunch item when topped with a poached egg or a drizzle of hollandaise sauce. The possibilities are endless!
Make Ahead and Storage
Storing Leftovers
Leftover stuffed mashed potato nests keep well in an airtight container in the refrigerator for up to three days. Make sure they’re fully cooled before storing to maintain texture and freshness.
Freezing
To freeze, place the baked nests on a parchment-lined tray and freeze until solid. Then transfer to a freezer-safe bag or container. They’ll keep up to two months and make an excellent quick snack or side when reheated.
Reheating
Reheat frozen or refrigerated nests in a preheated oven at 350°F (175°C) for 10-15 minutes or until warmed through and crispy again. Avoid microwaving if you want to keep that crunchy texture intact.
FAQs
Can I use a different type of potato?
While russet potatoes are ideal for their fluffy texture, you can also use Yukon Golds for a creamier mash. Just keep in mind the texture may vary slightly.
Is there a vegetarian version of the recipe?
Absolutely! Simply omit the bacon and add extra cheese or veggies like sautéed mushrooms or spinach to keep things flavorful and hearty.
Can I make the nests gluten-free?
Yes, skip the panko breadcrumbs or use gluten-free breadcrumbs instead to maintain the crunchy topping without gluten.
What can I use instead of sour cream?
You can replace sour cream with Greek yogurt or cream cheese for a similar tangy creaminess that blends beautifully into the mashed potatoes.
How long do these potato nests keep their crispiness?
They’re best enjoyed fresh from the oven for maximum crispness but will maintain a pleasant texture for a few hours at room temperature. Reheating in the oven refreshes the crunch nicely.
Final Thoughts
This Stuffed Mashed Potato Nests Recipe is one of those dishes that feels cozy yet impressive, simple but packed with flavor. Once you try making them, you’ll understand why they quickly become a favorite to share with friends and family. So grab some potatoes, get creative with your fillings, and enjoy the magic of these delightful little nests. Trust me, your taste buds are in for a treat!
Print
Stuffed Mashed Potato Nests Recipe
- Prep Time: 15 minutes
- Cook Time: 20 minutes
- Total Time: 50 minutes
- Yield: 12 servings
- Category: Side Dish
- Method: Baking
- Cuisine: American
Description
Delicious and crispy stuffed mashed potato nests baked to golden perfection, featuring creamy mashed potatoes mixed with cheddar cheese and optional savory fillings like bacon and green onions. These bite-sized nests are perfect as a side dish or appetizer, topped with crunchy panko breadcrumbs and garnished with fresh parsley for a flavorful and visually appealing treat.
Ingredients
Potato Base
- 4 large russet potatoes, peeled and cubed
- 1/2 cup milk
- 4 tablespoons unsalted butter
- Salt and pepper to taste
Fillings
- 1/2 cup shredded cheddar cheese
- 1/4 cup cooked bacon, crumbled (optional)
- 1/4 cup green onions, chopped (optional)
- 1/4 cup sour cream (optional)
Topping & Garnish
- 1 tablespoon olive oil
- 1/2 cup panko breadcrumbs (optional for topping)
- 1/4 cup fresh parsley, chopped (optional, for garnish)
Instructions
- Preheat the oven: Preheat your oven to 375°F (190°C) and lightly grease a muffin tin or mini muffin tin to prevent sticking.
- Boil the potatoes: Place the peeled and cubed potatoes in a large pot of salted water and boil for 10-15 minutes, or until they are tender when pierced with a fork. Drain thoroughly and return to the pot.
- Mash the potatoes: Using a potato masher or hand mixer, mash the potatoes until smooth. Incorporate the milk, butter, salt, and pepper, then continue to mash until creamy and well blended.
- Add fillings: Stir in the shredded cheddar cheese along with optional fillings like crumbled bacon, chopped green onions, and sour cream if desired. Taste and adjust seasoning with additional salt and pepper as needed.
- Form the nests: Spoon portions of the mashed potato mixture into the muffin tin cups, pressing them down to form nests with wells in the center. Ensure the edges are thick enough to hold the filling without breaking.
- Add toppings: If using, sprinkle the tops of each nest with panko breadcrumbs to add a crispy texture.
- Drizzle with olive oil: Lightly drizzle olive oil over the tops to help the nests brown nicely and achieve a crunchy finish during baking.
- Bake: Place the muffin tin in the oven and bake for 15-20 minutes, or until the nests turn golden brown and the edges become crisp.
- Cool and garnish: Remove the nests from the oven and let them cool slightly before carefully removing them from the muffin tin. Garnish with freshly chopped parsley if desired.
- Serve: Serve the mashed potato nests warm as a delicious side dish or appetizer and enjoy their creamy, cheesy goodness with a crispy twist.
Notes
- For a vegetarian version, omit bacon and use vegetarian-friendly cheese.
- These nests can be prepared ahead of time and refrigerated before baking.
- Substitute milk with a dairy-free alternative to make it lactose-free.
- Panko breadcrumbs add extra crunch but can be omitted for a softer bite.
- Leftover nests can be reheated in the oven to restore crispiness.


