
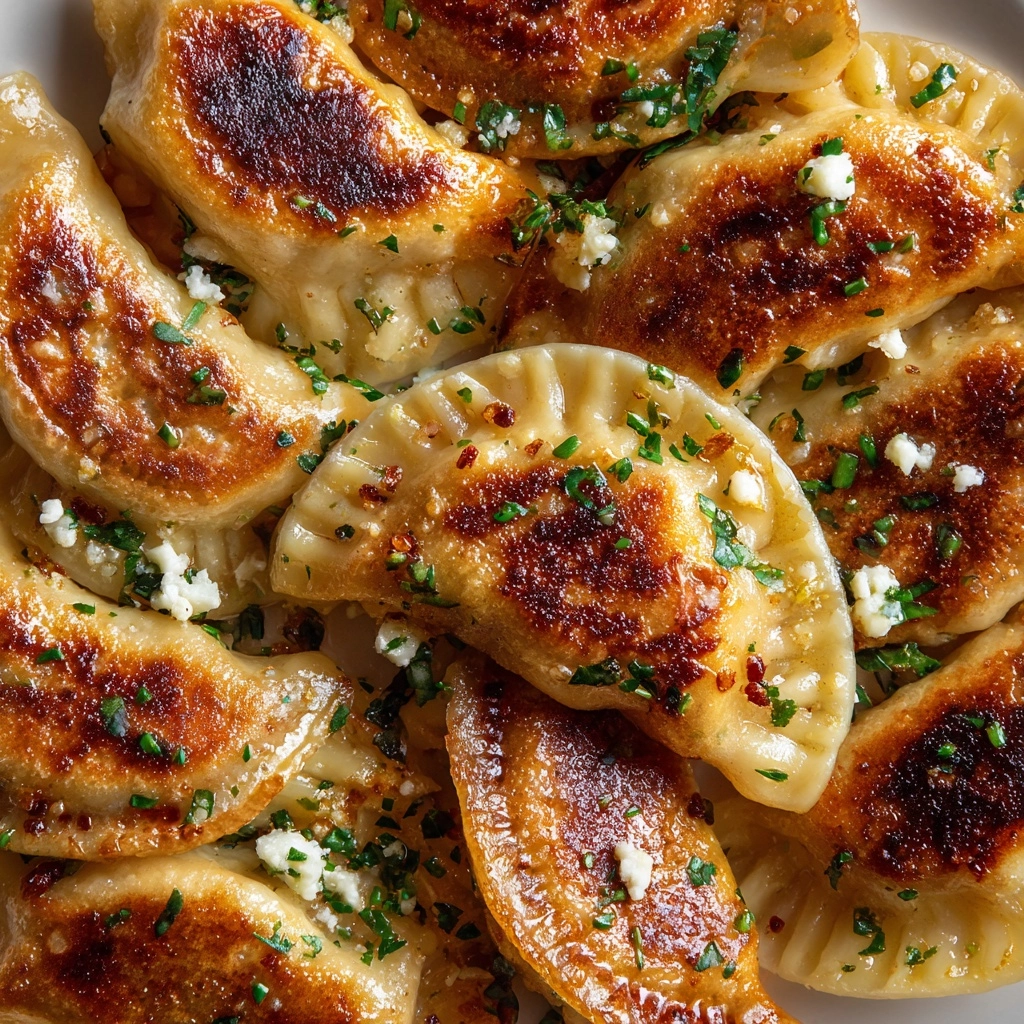
If you’re searching for a dish that’s equal parts comforting, impressive, and utterly delicious, Roasted Butternut Squash Feta Pierogi are about to become your new obsession. Imagine tender homemade dumplings filled with sweet roasted squash and tangy feta, topped with melted butter and fresh herbs—these pierogi are a celebration of flavors and textures that feels both familiar and completely unique. Whether you’re sharing them at a cozy family dinner or serving them as a show-stopping appetizer at your next gathering, this recipe delivers a taste of Eastern European tradition with a modern, veggie-packed twist.
Ingredients You’ll Need
Ingredients You’ll Need
Every component of these Roasted Butternut Squash Feta Pierogi brings something special to the table. From the pillowy dough to the vibrant, savory filling, each ingredient plays a starring role in crafting the ultimate bite.
- All-purpose flour: The foundation of the dough, providing structure and a soft, chewy texture.
- Salt: Essential for both the dough and filling, enhancing all the flavors.
- Large egg: Adds richness and helps bind the dough for easy rolling and shaping.
- Sour cream: Infuses the dough with tenderness and a subtle tang.
- Butter (softened): Lends richness and makes the dough extra supple to work with.
- Roasted butternut squash (mashed): Delivers natural sweetness, creaminess, and gorgeous golden color to the filling.
- Crumbled feta cheese: Adds a salty, tangy punch that pairs beautifully with the sweet squash.
- Black pepper: Brings gentle heat and depth to the filling.
- Ground nutmeg: A tiny pinch goes a long way, adding warmth and complexity.
- Salt (to taste): Lets you adjust the seasoning of your filling perfectly.
- Melted butter (for serving): A golden finishing touch that makes each pierogi irresistible.
- Chopped fresh herbs (like sage or parsley): Brightens up the dish with color and freshness.
- Sautéed onions or caramelized shallots (optional): For a sweet, savory flourish that takes these pierogi over the top.
How to Make Roasted Butternut Squash Feta Pierogi
Step 1: Make the Dough
Start by combining the flour and salt in a large bowl—this creates the sturdy base for your pierogi. In a separate bowl, whisk together the egg, sour cream, and softened butter until smooth. Pour the wet mixture into your flour and stir until a shaggy dough forms, then knead on a floured surface for 5 to 7 minutes. The dough should be soft, smooth, and just a little tacky. Wrap it in plastic and let it rest for 30 minutes to relax the gluten, which makes rolling much easier.
Step 2: Prepare the Roasted Butternut Squash Feta Filling
While your dough rests, it’s time to whip up the star of the show: the Roasted Butternut Squash Feta Pierogi filling. In a bowl, combine the mashed roasted butternut squash, crumbled feta, black pepper, nutmeg, and a pinch of salt. Mix until smooth and evenly combined—the vibrant orange flecked with feta is your sign you’re on the right track!
Step 3: Roll Out and Cut the Dough
On a lightly floured surface, roll the rested dough out to about 1/8-inch thickness. Keep it even for best results. Use a 3-inch round cutter or a sturdy drinking glass to cut out as many circles as you can. Gather and re-roll any scraps—you’ll want to use up every bit of this lovely dough.
Step 4: Fill and Shape the Pierogi
Spoon about 1 tablespoon of the filling into the center of each dough circle. Gently fold the dough over to form a half-moon, then pinch the edges tightly to seal. If you love a decorative touch, press the sealed edge with the tines of a fork. This not only looks pretty but helps keep your filling snug inside.
Step 5: Boil the Pierogi
Bring a large pot of salted water to a gentle boil. Working in batches, drop in the pierogi and cook for 3 to 4 minutes, or until they float to the top. That’s your cue that they’re perfectly cooked! Use a slotted spoon to transfer them to a plate and let any excess water drain off.
Step 6: Optional—Pan-Fry for Extra Flavor
For golden, crispy edges, heat a little butter in a skillet and pan-fry the boiled pierogi until each side is beautifully browned. This extra step is optional, but it adds an irresistible crunch and rich, nutty flavor.
Step 7: Serve and Enjoy
Plate your hot Roasted Butternut Squash Feta Pierogi and drizzle with melted butter. Sprinkle generously with fresh herbs, and don’t forget those sautéed onions or caramelized shallots if you’re feeling fancy. Serve right away for the ultimate comfort food experience.
How to Serve Roasted Butternut Squash Feta Pierogi
Garnishes
The finishing touches make all the difference! Melted butter is a must, soaking into every bite of pierogi. For an herby pop, scatter chopped sage or parsley over the top. A spoonful of sautéed onions or caramelized shallots adds sweet depth and beautiful contrast, while a little extra sprinkle of feta never hurts.
Side Dishes
These pierogi are hearty enough to shine on their own, but they’re even better with a fresh, vibrant salad—think arugula with lemon vinaigrette or a crisp cucumber salad. For a cozy meal, pair with roasted vegetables or a bowl of tangy borscht to play up the Eastern European vibes.
Creative Ways to Present
Roasted Butternut Squash Feta Pierogi are incredibly versatile for entertaining. Arrange them on a platter for a party appetizer with toothpicks and a yogurt-dill dip, or serve family-style in a big bowl with all the toppings on the side for a DIY pierogi bar. For an extra festive touch, try shaping the dough with seasonal cookie cutters!
Make Ahead and Storage
Storing Leftovers
If you find yourself with leftover Roasted Butternut Squash Feta Pierogi, store them in an airtight container in the refrigerator. They’ll stay fresh for up to three days, making them perfect for quick lunches or next-day snacks.
Freezing
One of the best parts about this recipe is how easily it freezes. Place uncooked, filled pierogi in a single layer on a parchment-lined tray and freeze until firm, then transfer to a freezer-safe bag. They’ll keep for up to two months and can be boiled straight from the freezer—no need to thaw!
Reheating
To reheat cooked pierogi, simply warm them in a skillet with a bit of butter until heated through and lightly crisped. You can also microwave them for a quick fix, but pan-frying brings back the best texture and flavor.
FAQs
Can I use store-bought butternut squash instead of roasting my own?
Absolutely! While freshly roasted squash gives the best flavor, canned or pre-cooked mashed butternut squash works just fine in a pinch. Just make sure it’s well-drained and not too watery.
What’s the best way to keep the pierogi from opening during cooking?
Seal the edges tightly by pinching firmly, and consider pressing with a fork for extra security. Make sure there’s no filling on the edge of the dough, as this can prevent a good seal.
Can I make Roasted Butternut Squash Feta Pierogi gluten-free?
Yes! Substitute a cup-for-cup gluten-free flour blend for the all-purpose flour. The texture may be a bit different, but you’ll still get delicious, tender dumplings.
What other cheeses can I use instead of feta?
Goat cheese, ricotta, or even a sharp white cheddar can stand in for feta, though each will bring its own unique flavor to the filling. Don’t be afraid to experiment to find your favorite combination!
How do I prevent my dough from drying out while shaping pierogi?
Keep any unused dough covered with plastic wrap or a damp towel as you work. This prevents the dough from forming a dry skin, which can make sealing tricky.
Final Thoughts
There’s just something magical about making Roasted Butternut Squash Feta Pierogi from scratch—each bite is a blend of sweet, savory, creamy, and crispy that’s hard to resist. Whether you’re a longtime pierogi lover or new to homemade dumplings, I hope this recipe inspires you to roll up your sleeves and create a batch to share with friends or family. Give it a try—you might just find your new favorite comfort food!
Print
Roasted Butternut Squash Feta Pierogi Recipe
- Prep Time: 1 hour
- Cook Time: 30 minutes
- Total Time: 1 hour 30 minutes
- Yield: 24 pierogi (4–6 servings)
- Category: Main Course, Appetizer
- Method: Boiling, Pan-Frying
- Cuisine: Eastern European-Inspired
- Diet: Vegetarian
Description
Delight in these homemade Roasted Butternut Squash Feta Pierogi, a comforting Eastern European-inspired dish featuring tender dumplings filled with creamy roasted butternut squash and tangy feta cheese. Perfect as a main course or appetizer, these vegetarian pierogi are boiled until tender and optionally pan-fried for a crispy finish, then served with melted butter and fresh herbs for a flavorful meal.
Ingredients
Dough
- 2 ½ cups all-purpose flour
- 1 teaspoon salt
- 1 large egg
- ½ cup sour cream
- ¼ cup butter, softened
Filling
- 1 ½ cups roasted butternut squash, mashed
- ¾ cup crumbled feta cheese
- ¼ teaspoon black pepper
- ⅛ teaspoon ground nutmeg
- Salt, to taste
For Serving
- Melted butter
- Chopped fresh herbs (sage or parsley)
- Sautéed onions or caramelized shallots (optional)
Instructions
- Prepare the dough: In a large bowl, combine the all-purpose flour and salt. In a separate bowl, whisk together the egg, sour cream, and softened butter. Add the wet ingredients to the flour mixture and stir until a rough dough forms. Knead the dough on a floured surface for 5 to 7 minutes until smooth and elastic. Wrap the dough in plastic wrap and let it rest for 30 minutes to relax.
- Make the filling: While the dough rests, combine the roasted mashed butternut squash, crumbled feta, black pepper, ground nutmeg, and a pinch of salt in a bowl. Mix thoroughly until the filling is smooth and well incorporated.
- Roll out the dough: On a floured surface, roll the rested dough to a thickness of about 1/8 inch. Use a 3-inch round cutter or glass to cut out circles from the dough, ensuring uniform size for even cooking.
- Fill and shape pierogi: Place approximately one tablespoon of the squash and feta filling in the center of each dough circle. Fold the dough over to form a half-moon shape and pinch the edges tightly to seal. For a decorative finish, press the edges with a fork to reinforce the seal and add texture.
- Cook the pierogi: Bring a large pot of salted water to a boil. Working in batches, drop the pierogi into the boiling water and cook for 3 to 4 minutes or until they float to the surface, indicating they are cooked through. Remove them with a slotted spoon and set aside.
- Optional pan-frying: For a golden, crispy exterior, heat some butter in a skillet over medium heat. Pan-fry the boiled pierogi for 2 to 3 minutes on each side until golden brown and crisp.
- Serve: Serve the pierogi warm with melted butter, sprinkled with chopped fresh herbs such as sage or parsley. Optionally, top with sautéed onions or caramelized shallots to enhance the flavors.
Notes
- You can roast your own butternut squash by cubing it and baking at 400°F (200°C) for 25–30 minutes until tender, then mashing.
- For a slightly sweeter filling, add a teaspoon of maple syrup to the butternut squash mixture.
- These pierogi can be prepared ahead of time and frozen before boiling. Simply thaw and boil when ready to serve.
- If you prefer, pierogi dough can be made with sour cream substitute or Greek yogurt for slight variations.
- Pan-frying after boiling offers a delightful crispy texture but is optional if you prefer boiled-only dumplings.
Nutrition
- Serving Size: 4 pierogi
- Calories: 280
- Sugar: 2 g
- Sodium: 340 mg
- Fat: 12 g
- Saturated Fat: 7 g
- Unsaturated Fat: 4 g
- Trans Fat: 0 g
- Carbohydrates: 34 g
- Fiber: 2 g
- Protein: 8 g
- Cholesterol: 55 mg


