
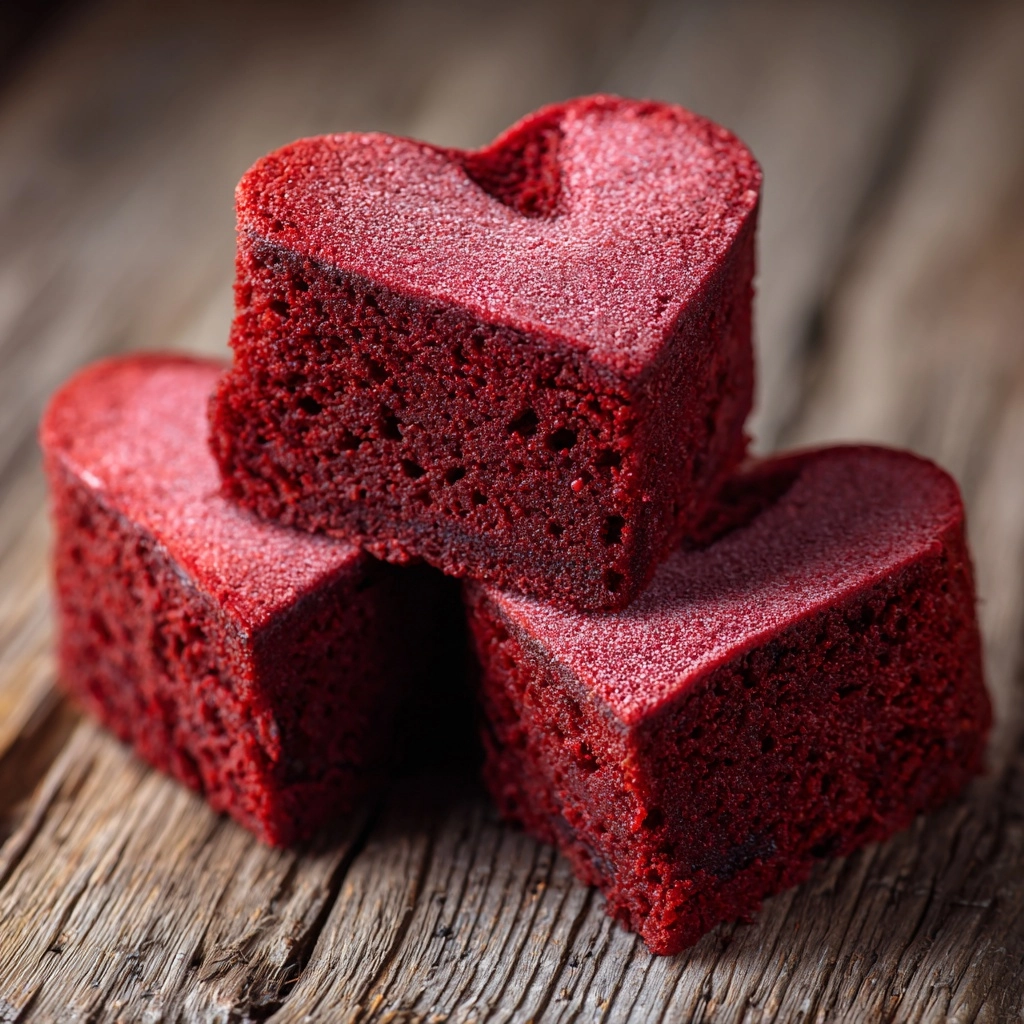
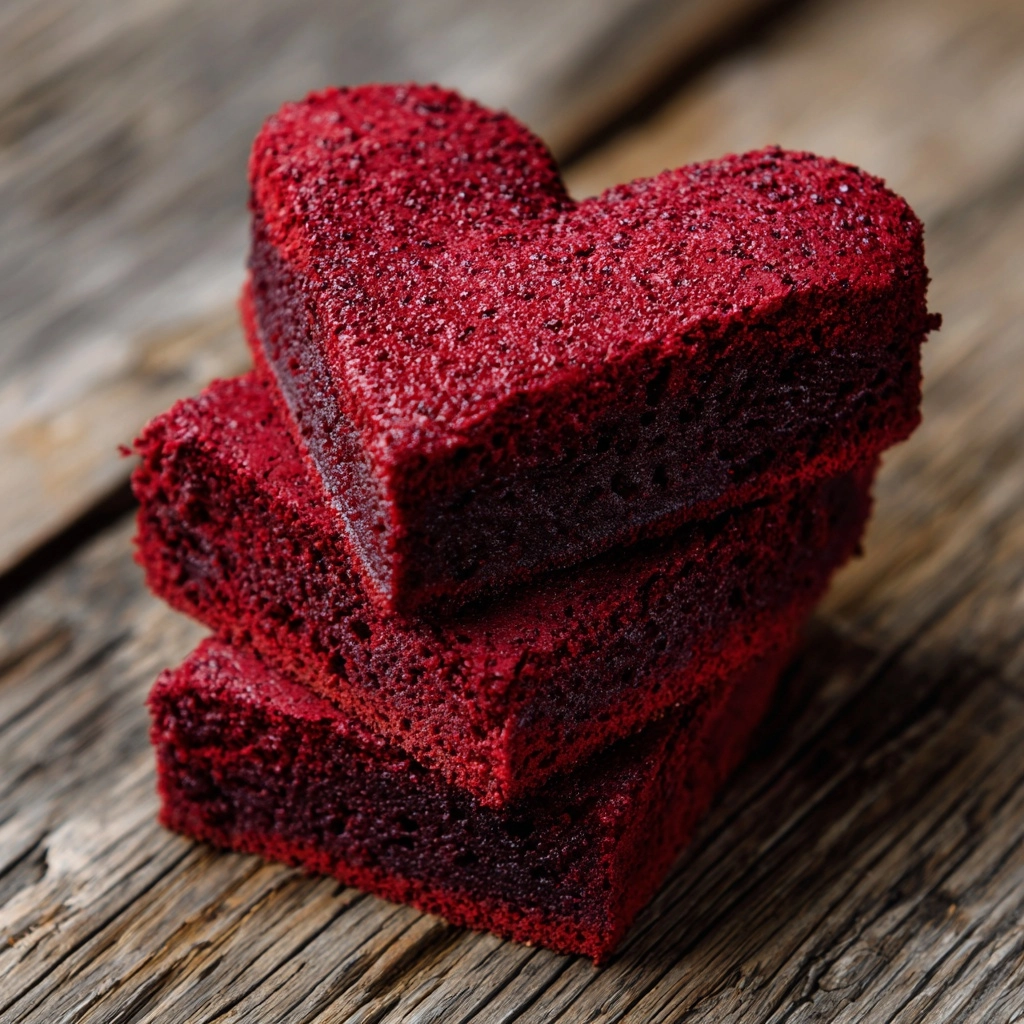
If you’re searching for the ultimate way to say “I love you” with dessert, look no further than these Red Velvet Brownie Hearts. They’re everything you adore about red velvet — that irresistible hint of chocolate, the beautiful ruby hue — but in the form of fudgy brownies cut into sweet, festive hearts. Whether you’re baking for Valentine’s Day, a special anniversary, or just to make an ordinary day feel extraordinary, these brownies are guaranteed to melt hearts and spark smiles.
Ingredients You’ll Need
Making Red Velvet Brownie Hearts is surprisingly easy, and the magic lies in the thoughtful combination of simple pantry staples. Each ingredient brings its own flair, from the deep cocoa notes to the signature red color and a touch of tang that makes red velvet so special.
- Unsalted butter (1/2 cup, melted): Provides rich flavor and ensures that signature fudgy brownie texture.
- Granulated sugar (1 cup): Sweetens the brownies and helps create a shiny, crackly top.
- Large eggs (2): Bind everything together while making the brownies moist and chewy.
- Vanilla extract (1 teaspoon): Adds depth and warmth to every bite.
- Red food coloring (1 tablespoon): Delivers that classic red velvet wow-factor — vibrant and festive!
- Unsweetened cocoa powder (1/4 cup): Brings chocolate flavor without overpowering the signature red velvet taste.
- All-purpose flour (3/4 cup): Gives the brownies enough structure while keeping them soft and tender.
- Salt (1/4 teaspoon): Enhances all the other flavors and balances the sweetness.
- White vinegar (1/2 teaspoon): A traditional red velvet addition that boosts color and adds a subtle tang.
- Mini chocolate chips (1/2 cup, optional): For bursts of melty chocolate in every bite — totally irresistible!
- Powdered sugar or cream cheese frosting (optional): Perfect for decorating and adding a touch of elegance.
How to Make Red Velvet Brownie Hearts
Step 1: Prep Your Pan
Start by preheating your oven to 350°F (175°C). Line an 8×8-inch baking pan with parchment paper, leaving a little overhang on the sides. This will make it super easy to lift the brownies out later, especially when you’re cutting those adorable hearts.
Step 2: Whisk the Wet Ingredients
In a large mixing bowl, whisk together the melted butter and granulated sugar until the mixture looks smooth and glossy. Add the eggs, vanilla extract, and red food coloring. Whisk again until everything is beautifully blended and vibrantly red.
Step 3: Add the Dry Ingredients
Now, gently stir in the cocoa powder, all-purpose flour, salt, and white vinegar. Mix just until everything is combined — don’t overdo it! If you’re feeling extra indulgent, fold in the mini chocolate chips for those gooey chocolate pockets.
Step 4: Bake to Perfection
Pour the batter into your prepared pan and smooth the top with a spatula. Bake in the preheated oven for 25 to 30 minutes. You’ll know they’re ready when a toothpick inserted in the center comes out with a few moist crumbs (not wet batter).
Step 5: Cool and Cut Out Hearts
Let the brownies cool completely in the pan — patience pays off here! Once they’re cool, lift the brownies out using the parchment paper. For those crisp, clean heart shapes, chill the brownies in the fridge before cutting. Then, use a heart-shaped cookie cutter to create your Red Velvet Brownie Hearts. Don’t toss the scraps — they’re delicious on ice cream or yogurt.
Step 6: Decorate and Enjoy
Finish your Red Velvet Brownie Hearts with a dusting of powdered sugar or a drizzle of cream cheese frosting. Let your creativity shine and have fun with sprinkles or edible glitter if you like!
How to Serve Red Velvet Brownie Hearts
Garnishes
A simple dusting of powdered sugar gives your brownies a charming, snow-kissed look, while a swirl of cream cheese frosting adds that classic red velvet touch. For an extra pop, try topping with fresh berries or a few chocolate curls — they’ll look bakery-worthy in no time!
Side Dishes
Red Velvet Brownie Hearts pair beautifully with a scoop of vanilla ice cream or a dollop of whipped cream. For a cozy afternoon treat, serve them alongside a cup of coffee or a tall glass of cold milk. If you’re feeling fancy, a little fruit salad on the side balances the richness perfectly.
Creative Ways to Present
Arrange your Red Velvet Brownie Hearts on a pretty platter for a show-stopping centerpiece, or wrap each one individually in parchment and ribbon for sweet homemade gifts. Stack them in a tower for a dramatic dessert display, or serve them in cupcake liners for easy, mess-free sharing at parties or picnics.
Make Ahead and Storage
Storing Leftovers
To keep your Red Velvet Brownie Hearts soft and fresh, store them in an airtight container at room temperature for up to 3 days. If you’ve decorated with cream cheese frosting, refrigerate them to maintain freshness and food safety.
Freezing
Red Velvet Brownie Hearts freeze beautifully! Just arrange them in a single layer on a baking sheet, freeze until firm, then transfer to a freezer-safe bag or container. They’ll keep for up to 2 months — perfect for future cravings or last-minute celebrations.
Reheating
When you’re ready to enjoy a frozen heart, let it thaw at room temperature for 20-30 minutes. If you like your brownies slightly warm, pop them in the microwave for a few seconds — just enough to bring back that just-baked, fudgy magic.
FAQs
Can I use a different pan size if I don’t have an 8×8-inch pan?
Absolutely! You can use a 9×9-inch pan for slightly thinner brownies or a loaf pan for thicker ones. Just keep an eye on the baking time — thinner brownies bake faster, while thicker ones may need a few extra minutes.
What can I do with the leftover brownie scraps after cutting out the hearts?
Don’t throw them away! Crumble the scraps over ice cream, parfaits, or yogurt for a decadent treat. You can also freeze them and use as a surprise layer in trifles or milkshakes.
Do I have to use red food coloring?
The red food coloring is what gives Red Velvet Brownie Hearts their classic look, but if you prefer to skip it, the brownies will still taste delicious with a more traditional chocolate color.
Can I make these brownies gluten-free?
Yes! Simply swap the all-purpose flour for your favorite 1-for-1 gluten-free baking blend. The results are just as fudgy and flavorful, so everyone can enjoy.
How do I get clean cuts with the cookie cutter?
For the best results, chill the brownies in the fridge before cutting, and wipe your cookie cutter clean between each cut. This helps you get those perfect, sharp-edged Red Velvet Brownie Hearts every time.
Final Thoughts
There’s something truly magical about sharing homemade Red Velvet Brownie Hearts with the people you love. Whether you serve them at a party or just enjoy one with your afternoon coffee, they’re sure to bring joy and a little sparkle to any day. Give this recipe a whirl — you’ll fall in love with every bite!
Print
Red Velvet Brownie Hearts Recipe
- Prep Time: 15 minutes
- Cook Time: 30 minutes
- Total Time: 45 minutes
- Yield: 8–10 heart-shaped brownies
- Category: Dessert
- Method: Baking
- Cuisine: American
- Diet: Vegetarian
Description
Delight in these festive Red Velvet Brownie Hearts, perfect for Valentine’s Day or any romantic occasion. These rich, moist brownies combine the classic tang of red velvet with the fudgy texture of a brownie, finished with a sprinkle of powdered sugar or a drizzle of cream cheese frosting for an irresistible treat.
Ingredients
Brownie Batter:
- 1/2 cup unsalted butter (melted)
- 1 cup granulated sugar
- 2 large eggs
- 1 teaspoon vanilla extract
- 1 tablespoon red food coloring
- 1/4 cup unsweetened cocoa powder
- 3/4 cup all-purpose flour
- 1/4 teaspoon salt
- 1/2 teaspoon white vinegar
- 1/2 cup mini chocolate chips (optional)
Decoration (Optional):
- Powdered sugar
- Cream cheese frosting
Instructions
- Preheat and Prepare Pan: Preheat your oven to 350°F (175°C). Line an 8×8-inch baking pan with parchment paper, allowing an overhang on the sides for easy removal of the brownies.
- Mix Wet Ingredients: In a large mixing bowl, whisk together the melted butter and granulated sugar until the mixture is smooth and glossy. Add the eggs, vanilla extract, and red food coloring, whisking until fully combined and vibrant in color.
- Add Dry Ingredients: Sift in the unsweetened cocoa powder, all-purpose flour, salt, and white vinegar. Gently stir until just combined to avoid overmixing, which can toughen the brownies.
- Incorporate Chocolate Chips: Fold in the mini chocolate chips if using, distributing them evenly throughout the batter for extra bursts of chocolate.
- Bake: Pour the batter into the prepared baking pan, smoothing out the top with a spatula. Bake for 25 to 30 minutes, or until a toothpick inserted in the center comes out with a few moist crumbs.
- Cool: Allow the brownies to cool completely in the pan on a wire rack to set properly.
- Cut into Hearts: Once cooled, use a heart-shaped cookie cutter to cut the brownies into individual heart shapes.
- Decorate: Optionally, decorate the heart-shaped brownies with a dusting of powdered sugar or drizzle with cream cheese frosting for an added touch of sweetness and presentation.
Notes
- For cleaner and neater cuts, chill the brownies in the refrigerator before cutting with the cookie cutter.
- Leftover brownie scraps can be crumbled and used as a delicious topping for ice cream, yogurt, or parfaits.
- These brownies freeze well for up to 2 months when stored in an airtight container; thaw at room temperature before serving.
Nutrition
- Serving Size: 1 heart-shaped brownie
- Calories: 210
- Sugar: 18g
- Sodium: 85mg
- Fat: 11g
- Saturated Fat: 6g
- Unsaturated Fat: 4g
- Trans Fat: 0g
- Carbohydrates: 27g
- Fiber: 1g
- Protein: 2g
- Cholesterol: 45mg

