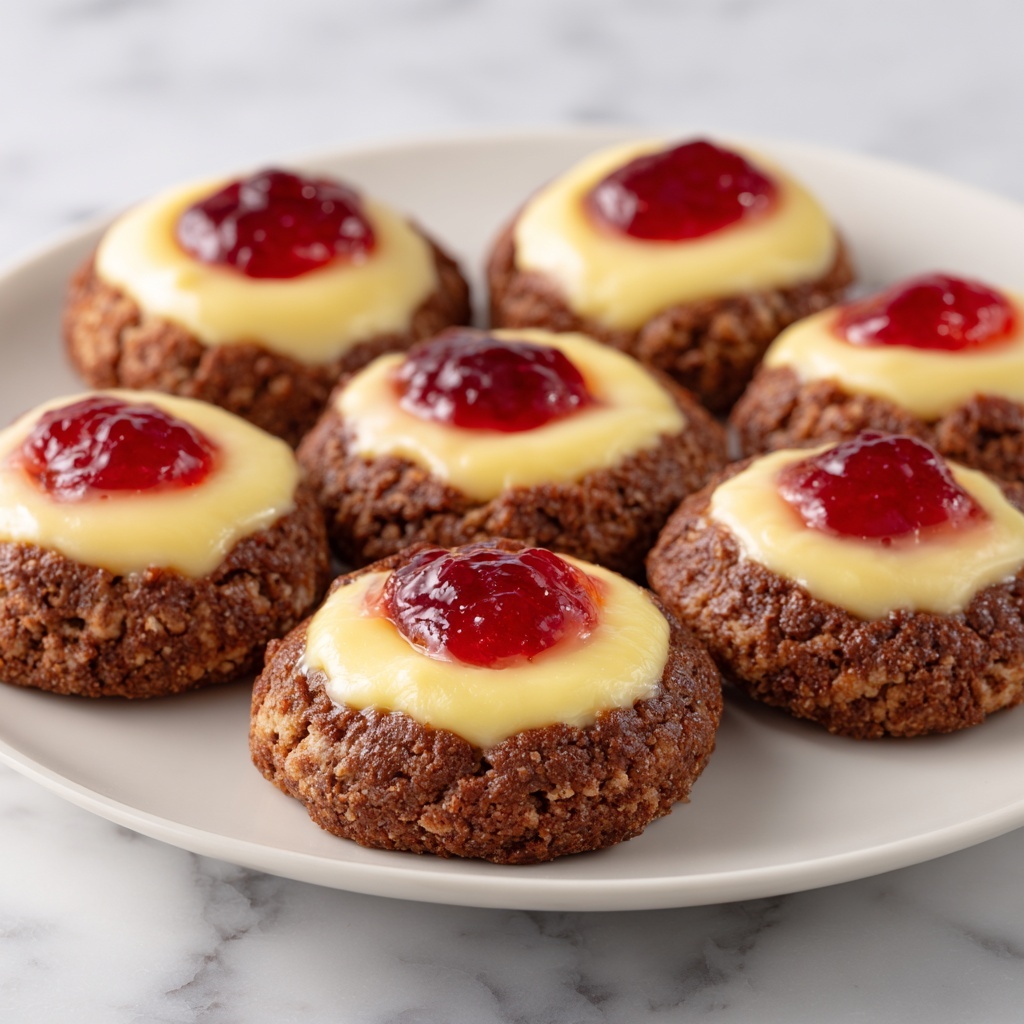
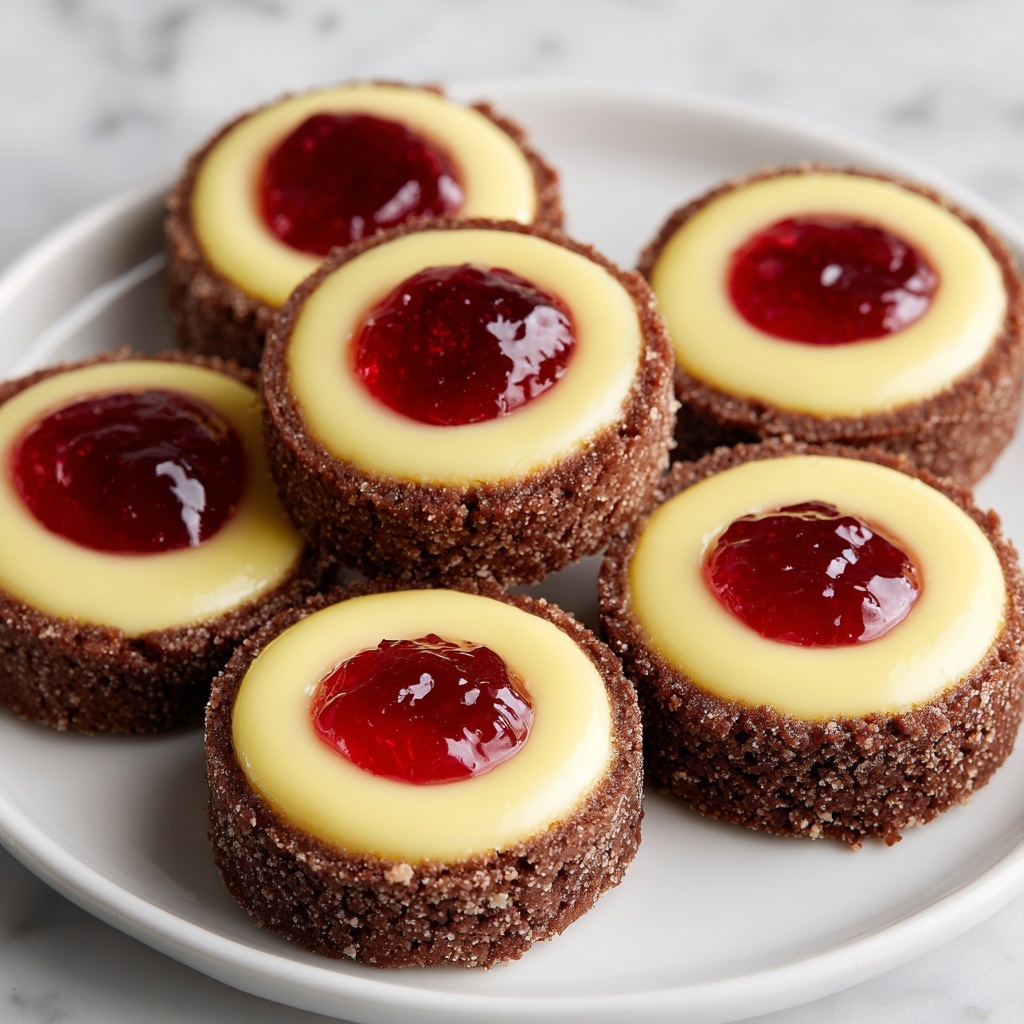
If you have a soft spot for cookies that combine rich, buttery dough with the creamy, tangy allure of cheesecake topped with fruity jam, then you are absolutely going to adore this Mouthwatering Cheesecake Thumbprint Cookies Recipe. These are not your everyday cookies – they’re a heavenly treat that feels both nostalgic and elegant, perfect for any occasion. Every bite delivers a tender, melt-in-your-mouth texture that’s elevated by that irresistible cheesecake center and a burst of vibrant berry flavor. Whether you’re baking for a holiday, a special gathering, or just to satisfy your sweet tooth, these thumbprint beauties will quickly become a beloved classic.
Ingredients You’ll Need
The magic of this Mouthwatering Cheesecake Thumbprint Cookies Recipe lies in the simplicity and harmony of its ingredients. Each one plays a crucial role in achieving the perfect balance of flavor, texture, and color – from the rich butter that keeps the dough tender, to the cream cheese that gives the filling its creamy tang, and the bright berry jam that adds a sweet pop of color and taste.
- 1 cup unsalted butter, softened: Provides a rich, creamy base for the cookie dough and ensures a tender crumb.
- 1/2 cup granulated sugar: Adds sweetness and lightness to the dough’s texture.
- 1/4 cup light brown sugar, packed: Introduces subtle caramel notes that enhance depth.
- 2 large egg yolks, room temperature: Binds ingredients and adds richness to the dough.
- 2 teaspoons vanilla extract: Brings warmth and aromatic sweetness.
- 2 1/2 cups all-purpose flour: Creates the sturdy yet tender structure for the cookies.
- 1/2 teaspoon fine salt: Balances sweetness and boosts flavor complexity.
- 6 ounces cream cheese, softened (brick style, full-fat): The decadent heart of the thumbprint, providing luscious creaminess.
- 1/3 cup powdered sugar: Sweetens and smooths the cheesecake filling.
- 1 large egg yolk, room temperature: Helps thicken and enrich the cheesecake center.
- 1 teaspoon vanilla extract: Enhances the creamy filling’s flavor.
- 1 teaspoon fresh lemon juice or 1/2 teaspoon lemon zest: Adds a bright, refreshing zing to cut through the richness.
- 1/3 cup raspberry, strawberry, or mixed berry jam (or pie filling): Adds vibrant color and a sweet-tart finish that complements the cheesecake perfectly.
How to Make Mouthwatering Cheesecake Thumbprint Cookies Recipe
Step 1: Cream the Butter and Sugars
Start by lining two baking sheets with parchment paper to ensure your cookies bake evenly without sticking. Then, in a large mixing bowl, beat the softened unsalted butter with granulated sugar and light brown sugar until your mixture turns light, creamy, and just a bit fluffy. This 2 to 3-minute step is key for light, tender cookies.
Step 2: Mix in Egg Yolks and Vanilla
Next, add the egg yolks and vanilla extract to the butter mixture. Beat everything together thoroughly, making sure to scrape down the bowl’s sides to combine all the ingredients into a smooth, homogenous dough base.
Step 3: Combine Dry Ingredients
In a separate bowl, whisk together the flour and salt. Gradually add these dry ingredients to the wet mixture on low speed, mixing just until a soft, thick dough forms. Be careful not to overmix here; you want the dough to remain tender and not get tough.
Step 4: Shape the Cookies
Using a tablespoon measure or a small scoop, divide the dough into many even portions. Roll each into a smooth ball with your hands and place them on the prepared baking sheets, spaced slightly apart. This simple step sets the stage for picture-perfect thumbprint cookies.
Step 5: Chill the Dough
Refrigerate those dough balls for at least 30 minutes and up to 2 hours until they’re firm to the touch. Chilling helps the cookies maintain their shape during baking and enriches the dough’s flavor.
Step 6: Prepare the Cheesecake Filling
While your dough chills, whisk together the softened cream cheese and powdered sugar until creamy and smooth. Then add the egg yolk, vanilla extract, and fresh lemon juice or zest. Continue beating until you achieve a thick, velvety mixture that will be the luscious center for your cookies.
Step 7: Create the Thumbprints
Preheat your oven to 350°F (175°C). Take the chilled dough out and gently press a well into the center of each ball using your thumb or the back of a 1/2-teaspoon measuring spoon. If the edges crack, just smooth them out with your fingers—it’s part of the charm!
Step 8: Fill with Cheesecake Mixture
Carefully spoon or pipe the creamy cheesecake filling into each thumbprint cavity. Fill it nearly to the top but avoid overflow to keep them neat and tidy.
Step 9: Add Jam and Swirl
A small dollop of raspberry, strawberry, or mixed berry jam goes on top of the cheesecake filling. If you’re feeling creative, gently swirl the jam into the cheesecake with a toothpick to create a beautiful marbled effect that’s almost too pretty to eat.
Step 10: Bake to Perfection
Bake the cookies one sheet at a time for about 11 to 13 minutes until the edges turn a soft golden brown and the cheesecake filling looks set but not browned. The centers may look slightly soft but will firm up as they cool.
Step 11: Cool Carefully
Remove your cookies from the oven and let them rest for 5 minutes on the baking sheet before transferring them to a wire rack. This gradual cooling step is important for the cheesecake centers to firm beautifully without cracking.
Step 12: Final Touches
Once cooled, your Mouthwatering Cheesecake Thumbprint Cookies Recipe is ready to be enjoyed as they are, or add an extra tiny swirl of jam on top for that finishing touch. Store any leftovers in an airtight container in the refrigerator and bring them to room temperature before serving for the best flavor and texture.
How to Serve Mouthwatering Cheesecake Thumbprint Cookies Recipe

Garnishes
For a delightful presentation, try garnishing your thumbprint cookies with fresh berries like raspberries or sliced strawberries. A light dusting of powdered sugar can add a lovely snowy effect that makes these treats even more inviting.
Side Dishes
Need a little extra pairing? These cookies go beautifully with a hot cup of coffee or a fruity tea. For an indulgent dessert plate, serve alongside a dollop of whipped cream or a scoop of vanilla ice cream to complement the tangy cheesecake filling.
Creative Ways to Present
Make your cookie platter pop by arranging the thumbprint cookies around a bowl of fresh jam for dipping. You can also stack them between sheets of parchment for gifting or create colorful assortments by using different jam flavors to brighten up your cookie display.
Make Ahead and Storage
Storing Leftovers
Keep your leftover Mouthwatering Cheesecake Thumbprint Cookies in an airtight container in the fridge for up to a week. The cookies maintain their tenderness, and the cheesecake stays creamy and fresh. Just let them warm to room temperature before serving to enjoy their full flavor.
Freezing
These cookies freeze wonderfully. Place them in a single layer on a baking sheet to freeze individually first, then transfer to a sealed freezer bag or container. Frozen cookies are best enjoyed within 2 months. When ready, thaw them overnight in the refrigerator.
Reheating
To bring back that freshly-baked softness, warm your refrigerated or thawed cookies in a low oven (about 300°F / 150°C) for 5 to 8 minutes. Keep an eye on them so the cheesecake filling doesn’t brown. Allow a few minutes to cool slightly before digging in.
FAQs
Can I use low-fat cream cheese for the filling?
While you can substitute low-fat cream cheese, keep in mind that full-fat cream cheese gives the best rich and creamy texture. The filling might be less smooth and tangy with lower-fat versions, but your cookies will still taste delicious.
What type of jam works best in this recipe?
Raspberry, strawberry, or mixed berry jams are fantastic choices because their sweet-tart flavors complement the cheesecake filling beautifully. You can also experiment with other fruit jams like apricot or blueberry based on your taste preference.
Can I make the dough ahead of time?
Absolutely! You can prepare the dough, shape it into balls, and keep it refrigerated for up to 2 hours before filling and baking. This chilling step not only improves texture but makes cookie assembly more manageable.
Why does the cheesecake filling sometimes crack?
Cracking may occur if the oven temperature is too high or the filling is overbaked. Be sure to bake just until the edges are lightly golden and the cheesecake looks set but still slightly soft in the center to avoid cracks.
Can these cookies be made gluten-free?
Yes! You can substitute all-purpose flour with a gluten-free baking blend designed for one-to-one replacement. Just double-check the thickness of your dough as gluten-free flours sometimes absorb liquids differently, and adjust if needed.
Final Thoughts
This Mouthwatering Cheesecake Thumbprint Cookies Recipe truly brings together the best of both cookie and cheesecake worlds in a way that’s irresistible and fun to make. I encourage you to grab your ingredients, roll up your sleeves, and bake a batch soon—you’ll be rewarded with smiles and happy taste buds. Once you try these, I’m pretty sure they’ll become your go-to cookie for every sweet craving or special celebration!
Print
Mouthwatering Cheesecake Thumbprint Cookies Recipe
- Prep Time: 20 minutes
- Cook Time: 13 minutes
- Total Time: 1 hour 5 minutes
- Yield: 24 servings
- Category: Dessert
- Method: Baking
- Cuisine: American
Description
These Mouthwatering Cheesecake Thumbprint Cookies combine buttery, soft cookie dough with a creamy cheesecake filling and a sweet, fruity jam topping. Perfectly balanced in flavor and texture, these delightful cookies are chilled to hold their shape and baked to lightly golden perfection, making them an irresistible treat for any occasion.
Ingredients
Cookie Dough
- 1 cup unsalted butter, softened
- 1/2 cup granulated sugar
- 1/4 cup light brown sugar, packed
- 2 large egg yolks, room temperature
- 2 teaspoons vanilla extract
- 2 1/2 cups all-purpose flour
- 1/2 teaspoon fine salt
Cheesecake Filling
- 6 ounces cream cheese, softened (brick style, full-fat)
- 1/3 cup powdered sugar
- 1 large egg yolk, room temperature
- 1 teaspoon vanilla extract
- 1 teaspoon fresh lemon juice or 1/2 teaspoon lemon zest
Topping
- 1/3 cup raspberry, strawberry, or mixed berry jam (or pie filling)
Instructions
- Prepare Baking Sheets: Line two baking sheets with parchment paper and set aside to ensure non-stick baking and easy cleanup.
- Make Cookie Dough Base: In a large mixing bowl, beat the softened unsalted butter, granulated sugar, and light brown sugar on medium speed for 2 to 3 minutes until the mixture is light, creamy, and slightly fluffy.
- Add Egg Yolks and Vanilla: Incorporate the egg yolks and vanilla extract into the butter-sugar mixture, beating thoroughly and scraping down the sides of the bowl to achieve an even blend.
- Mix Dry Ingredients: In a separate bowl, whisk together the all-purpose flour and salt. Gradually add this to the wet ingredients on low mixer speed until a soft, thick dough forms, being careful not to overmix.
- Form Dough Balls: Scoop the dough into 1-tablespoon portions and roll each into smooth balls between your palms. Arrange them spaced apart on the prepared baking sheets.
- Chill Dough: Refrigerate the baking sheets with dough balls for at least 30 minutes or up to 2 hours to firm the dough and help maintain shape during baking.
- Make Cheesecake Filling: While dough chills, beat the softened cream cheese and powdered sugar until smooth and creamy. Add the egg yolk, vanilla extract, and lemon juice or zest, and beat again until the mixture becomes thick and silky.
- Preheat Oven and Create Thumbprints: Preheat oven to 350°F (175°C). Remove one tray of chilled dough. Using your thumb or a 1/2-teaspoon measuring spoon back, gently press a well into the center of each dough ball to create a thumbprint. Smooth any cracks carefully.
- Fill Thumbprints with Cheesecake: Spoon or pipe a small amount of the prepared cheesecake filling into each thumbprint well, filling nearly to the top without overflowing.
- Add Jam Topping: Place a small dollop of jam or pie filling atop the cheesecake layer. Optionally, gently swirl with a toothpick for a marbled effect.
- Bake Cookies: Bake one sheet at a time for 11 to 13 minutes, until edges are lightly golden and cheesecake filling is set but not browned; centers may appear slightly soft.
- Cool Cookies: Let cookies cool on the baking sheet for 5 minutes, then transfer to a wire rack to cool completely, allowing the cheesecake centers to firm up.
- Serve and Store: Serve cookies as-is or garnish with extra jam swirls. Store leftovers in an airtight container in the refrigerator; bring to room temperature for 15-20 minutes before serving for the best texture and flavor.
Notes
- Ensure all eggs and butter are at room temperature to maximize mixing and texture.
- Do not overmix the dough once flour is added to maintain tenderness.
- Chilling the dough is essential to keep cookies from spreading too much during baking.
- You can substitute the jam flavor based on preference—raspberry, strawberry, or mixed berry works best.
- Use full-fat cream cheese (brick style) for the optimal creamy texture in the filling.
- Store cookies refrigerated to keep cheesecake filling fresh, and let them warm slightly before eating for best flavor.


