
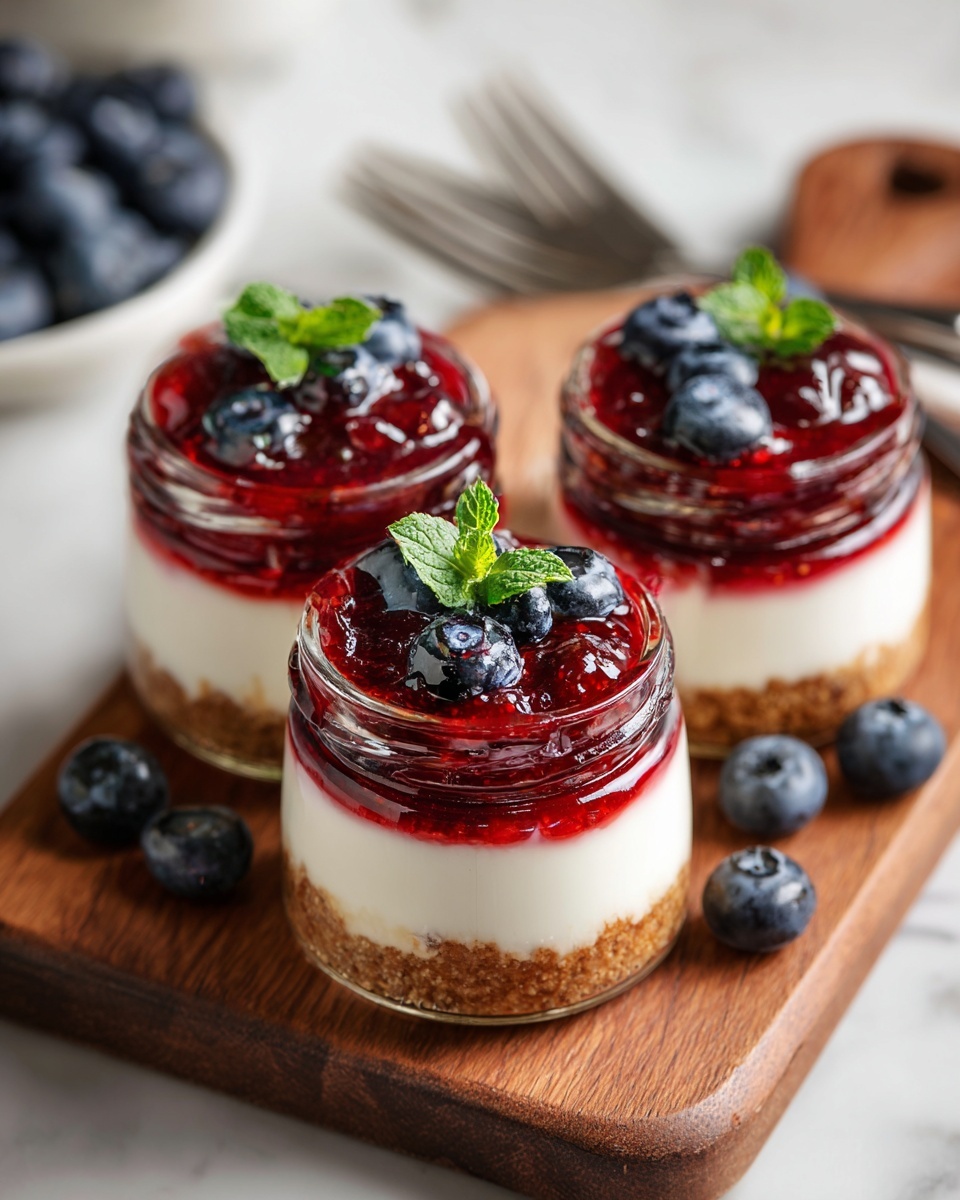
If you have a sweet tooth but don’t want to sacrifice your protein goals, you are going to adore this High-Protein Cheesecake Jars Recipe. It’s a delightful twist on the classic cheesecake that fits perfectly into a busy lifestyle. Creamy, satisfying, and packed with muscle-fueling goodness, these jars combine the tang of Greek yogurt, richness of cream cheese, and a hint of vanilla sweetness to deliver an indulgence that feels decadent yet wholesome. Whether as a post-workout treat or a guilt-free dessert, these cheesecake jars bring joy in every spoonful.
Ingredients You’ll Need
This recipe keeps it simple yet effective with ingredients that bring incredible texture and taste. Each element plays a starring role, whether it’s the creamy base, the crunchy crust, or the natural sweetness that ties it all together.
- Greek yogurt: Provides creaminess and a protein-packed tang with low fat or non-fat options for lighter texture.
- Cream cheese: Adds richness and smoothness necessary for that authentic cheesecake feel.
- Protein powder (vanilla or unflavored): Boosts protein content without overpowering the flavor.
- Honey or maple syrup: Natural sweeteners that balance tanginess with gentle sweetness.
- Vanilla extract: Enhances the overall flavor with a warm, fragrant note.
- Crushed graham crackers: Creates a satisfyingly crunchy crust at the jar’s bottom.
- Melted butter: Binds the crust together with a subtle buttery taste.
- Optional fresh berries or fruit topping: Adds freshness, color, and a pop of natural sweetness when desired.
How to Make High-Protein Cheesecake Jars Recipe
Step 1: Prepare the Crust
Start by combining the crushed graham crackers with melted butter in a small bowl. This mixture should hold together when pressed. Then, carefully press it into the bottom of your serving jars, creating a firm, even layer that forms the delicious crunchy base of your cheesecake.
Step 2: Beat the Cream Cheese
In a clean bowl, whip the softened cream cheese until it achieves a smooth and creamy texture. This step ensures there are no lumps and sets the stage for an ultra-silky cheesecake filling.
Step 3: Mix in the Protein and Flavor
Add the Greek yogurt, protein powder, honey or maple syrup, and vanilla extract to the cream cheese. Beat everything together until it becomes a luscious, well-blended mixture. The protein powder enriches the texture and nutritional profile without detracting from the flavor.
Step 4: Assemble the Jars
Carefully divide the cheesecake mixture over your graham cracker crusts inside the jars. This layering highlights the contrast between crunchy base and creamy filling, making each spoonful a textural delight.
Step 5: Chill to Set
Place your assembled jars in the refrigerator for at least two hours or overnight. This chilling time is crucial as it allows the cheesecake to firm up so that every bite holds together beautifully.
Step 6: Add Toppings Before Serving
Top each jar with a handful of fresh berries or your favorite fruit topping just before serving. This adds a refreshing burst of color and a little extra natural sweetness that complements the cheesecake perfectly.
How to Serve High-Protein Cheesecake Jars Recipe

Garnishes
A simple sprinkle of fresh raspberries, blueberries, or sliced strawberries instantly elevates these jars. You can even drizzle a touch of honey or dark chocolate for an extra touch of indulgence. Garnishes don’t just add beauty—they introduce flavor contrasts and freshness that brighten the dish.
Side Dishes
Serve alongside a handful of mixed nuts or a crisp green salad if you’re enjoying these jars as part of a larger snack or light meal. Because the jars themselves are nutrient-dense and satisfying, pairing them with something light and fresh balances the experience wonderfully.
Creative Ways to Present
Swap out the classic jar for mini mason jars or even elegant glass cups to turn this into party-perfect portions. Layer your toppings inside for a parfait effect or create mini cheesecake towers by alternating thin layers of crust and filling with different fruit preserves.
Make Ahead and Storage
Storing Leftovers
These cheesecake jars keep wonderfully in the refrigerator for up to 3 days when covered tightly. They maintain their fresh taste and creamy texture, making them an excellent make-ahead dessert or snack option for busy days.
Freezing
For longer storage, you can freeze the jars without toppings for up to one month. Be sure to thaw overnight in the fridge to preserve the smooth texture and then add fresh garnishes when ready to enjoy.
Reheating
This dessert is best served chilled, so avoid reheating. If you prefer a slightly softened texture after refrigeration, just leave the jar at room temperature for about 10 minutes before digging in.
FAQs
Can I use flavored protein powder in this recipe?
Absolutely! Vanilla or mild-flavored protein powders work best to complement the cheesecake without overpowering it. Chocolate can also be fun for a twist, just expect a different flavor profile.
Is it possible to make this recipe dairy-free?
Yes, you can substitute the cream cheese and Greek yogurt with plant-based alternatives like vegan cream cheese and coconut yogurt. The texture may vary slightly but will still be delicious and high in protein when paired with plant-based protein powder.
How can I make this recipe vegan?
Use vegan cream cheese, nondairy yogurt, a plant-based protein powder, and maple syrup instead of honey. Keep in mind that chilling time and texture may require slight adjustments, but delightful vegan jars are totally achievable.
Can I prepare these jars for a party?
Definitely! These jars are perfect for entertaining because they are portable, pre-portioned, and look adorable. You can make them a day in advance and focus on your guests when they arrive.
What’s the best way to get a crunchy crust?
Pressing the graham cracker and butter mixture firmly into the jar helps create a compact base. For extra crunch, you can bake the crust in individual jars at 350°F for 5-7 minutes before adding the filling, but this is optional.
Final Thoughts
There’s something truly special about enjoying a dessert that feels indulgent but supports your nutrition goals. The High-Protein Cheesecake Jars Recipe does exactly that, combining creamy texture, great flavor, and impressive protein content in one charming package. I promise once you try these, they’ll become an essential favorite you’ll want to make again and again. Go ahead, treat yourself to a jar or two—you deserve it!
Print
High-Protein Cheesecake Jars Recipe
- Prep Time: 15 minutes
- Cook Time: 0 minutes
- Total Time: 2 hours 15 minutes
- Yield: 4 servings
- Category: Dessert
- Method: No-Cook
- Cuisine: American
- Diet: Low Fat
Description
These High-Protein Cheesecake Jars offer a creamy, nutritious dessert or snack that’s easy to prepare and packed with protein. Layered with a buttery graham cracker crust and a smooth cheesecake filling enhanced with Greek yogurt and protein powder, these jars are perfect for a healthy treat or post-workout indulgence. Customize with fresh berries or your favorite fruit topping to add a bright finish.
Ingredients
Crust
- 1 cup crushed graham crackers
- 2 tbsp melted butter
Filling
- 8 oz cream cheese, softened
- 1 cup Greek yogurt (non-fat or low-fat)
- 1/4 cup protein powder (vanilla or unflavored)
- 1/4 cup honey or maple syrup
- 1 tsp vanilla extract
Topping (Optional)
- Fresh berries or fruit topping
Instructions
- Prepare the crust: In a small bowl, mix the crushed graham crackers with melted butter until the mixture is well combined. Press this mixture firmly into the bottom of serving jars to form the crust layer.
- Beat the cream cheese: In a separate bowl, beat the softened cream cheese until it becomes smooth and creamy, ensuring there are no lumps.
- Mix the filling: Add Greek yogurt, protein powder, honey (or maple syrup), and vanilla extract to the cream cheese. Mix thoroughly until the mixture is creamy and well combined, creating a smooth cheesecake filling.
- Assemble the jars: Evenly divide the cheesecake filling over the graham cracker crust layer in each jar, smoothing the top as needed.
- Chill to set: Refrigerate the assembled jars for at least 2 hours or preferably overnight. This chilling step allows the cheesecake filling to firm up and develop flavor.
- Add toppings and serve: Before serving, optionally top each jar with fresh berries or your preferred fruit topping to add color, flavor, and freshness.
Notes
- For a dairy-free version, substitute cream cheese and Greek yogurt with plant-based alternatives.
- Use unflavored protein powder if you prefer less sweetness or to customize flavor profiles.
- Honey can be replaced with maple syrup or agave nectar for vegan options.
- These jars can be prepared a day ahead, making them excellent for meal prep or entertaining.
- Experiment with different crusts such as crushed nuts or gluten-free cookies for variety.

