“`html
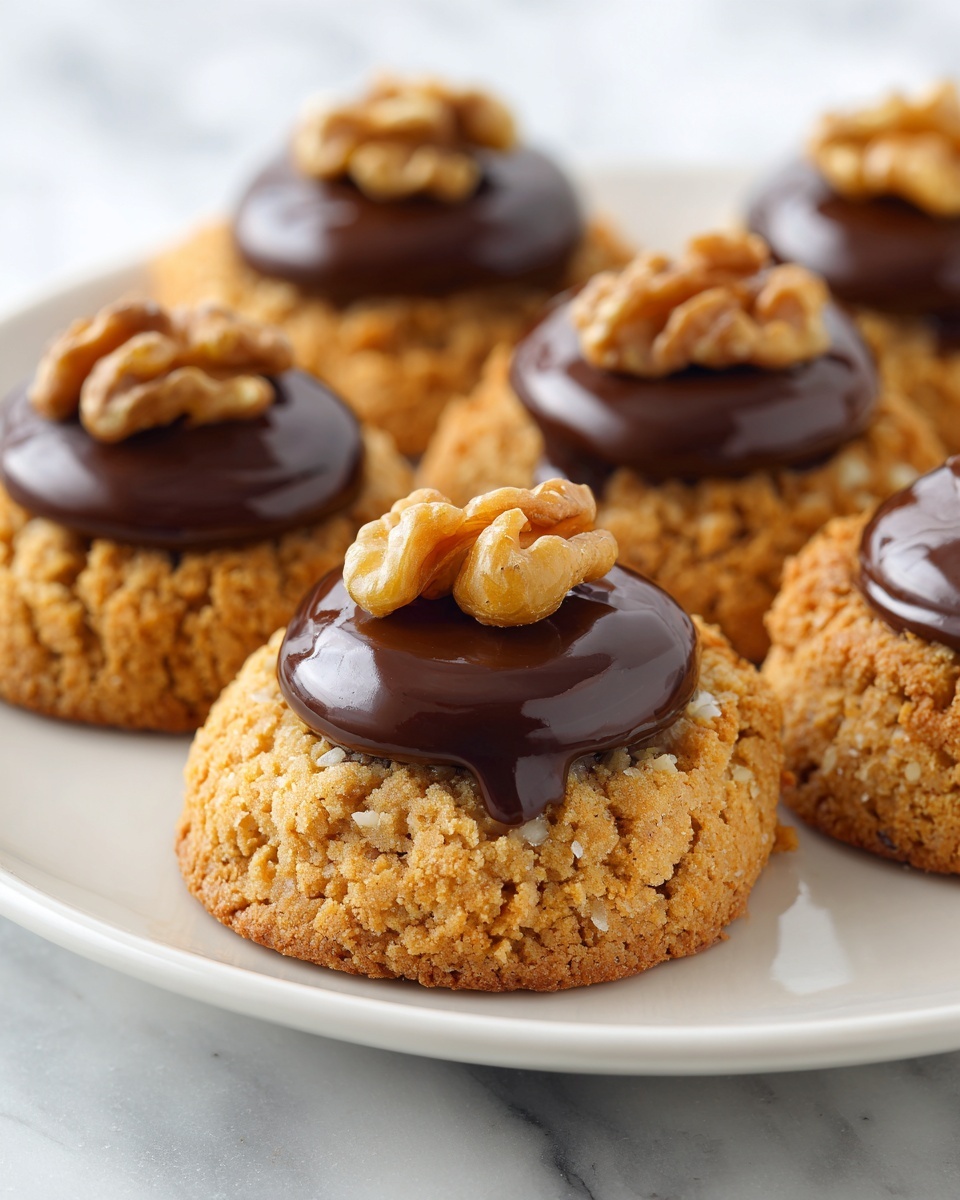
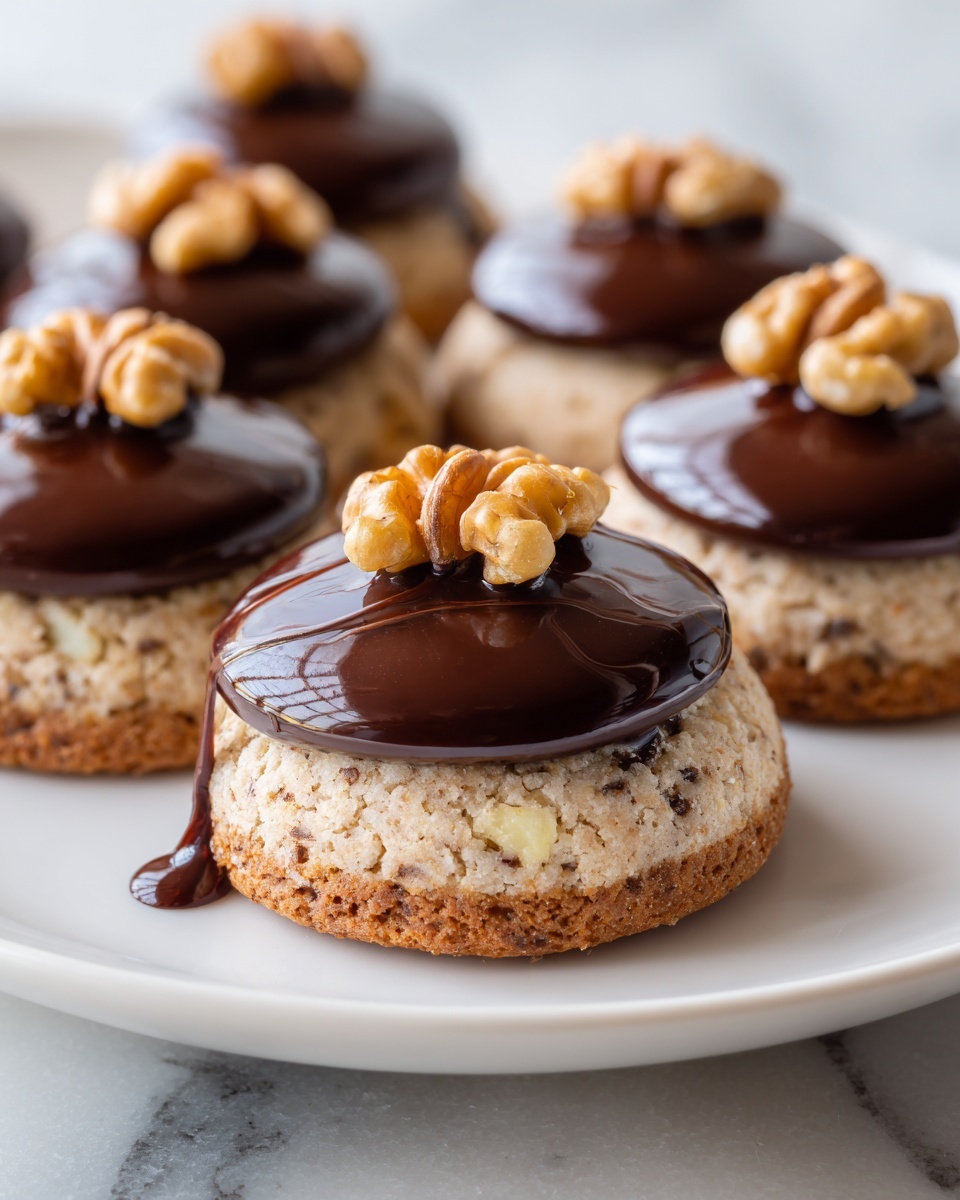
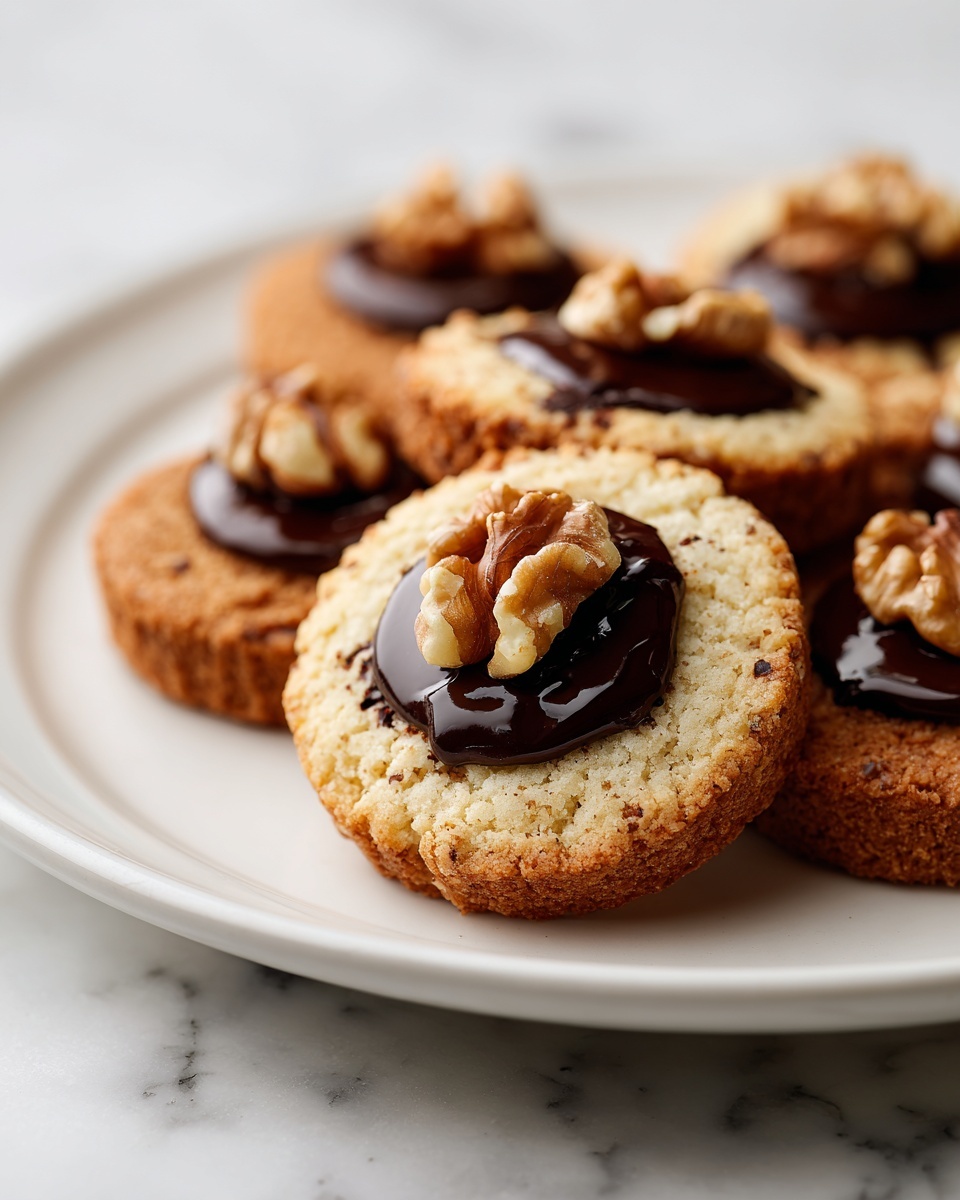
If you love the perfect blend of rich chocolate and toasty hazelnuts nestled in a buttery, tender cookie, you are going to absolutely adore this Chocolate Hazelnut Thumbprint Cookies Recipe. These delightful little treats offer a beautiful balance of flavors and textures; crisp edges give way to a melt-in-your-mouth center with a luscious dollop of chocolate that feels like a warm hug. Whether you’re baking for a special occasion or just craving a homemade indulgence, these cookies are straightforward to make and guaranteed to impress everyone lucky enough to try them.
Ingredients You’ll Need
Gathering a handful of simple ingredients is all you need to create these unforgettable cookies. Each one plays an important part, from the rich depth of cocoa powder to the nutty crunch of toasted hazelnuts, coming together to deliver a cookie that’s both classic and a little bit luxurious.
- 1 cup all-purpose flour: The sturdy base that gives structure and a tender crumb to your cookies.
- 1/4 cup unsweetened cocoa powder: Adds a deep, chocolatey intensity without extra sweetness.
- 1/2 cup unsalted butter, softened: Brings richness and moisture for a soft yet crisp texture.
- 1/4 cup granulated sugar: A touch of sweetness that balances perfectly with the cocoa.
- 1/4 cup brown sugar, packed: Adds caramel notes and helps keep the cookies chewy.
- 1 egg yolk: Enriches the dough, improving both flavor and tenderness.
- 3/4 cup toasted hazelnuts, chopped: Provides delightful crunch and a warm, nutty flavor.
- 1/2 cup semi-sweet chocolate chips or chocolate hazelnut spread: The star ingredient for that signature thumbprint filling packed with creamy indulgence.
How to Make Chocolate Hazelnut Thumbprint Cookies Recipe
Step 1: Prepare Your Oven and Baking Sheets
Begin by preheating your oven to 350°F (175°C). While the oven warms, line two baking sheets with parchment paper to ensure your cookies won’t stick and will bake evenly. This small prep step sets a smooth foundation for your baking adventure.
Step 2: Cream the Butter and Sugars
In a mixing bowl, blend the softened unsalted butter with both the granulated sugar and brown sugar. Beat until the mixture becomes light and fluffy—this process aerates the dough, lending to a tender texture and sweet flavor that’s just right.
Step 3: Add the Dry Ingredients
Slowly incorporate the all-purpose flour and unsweetened cocoa powder into your creamed sugar and butter, mixing just until everything comes together. It’s important not to overwork the dough here because you want your cookies to stay soft, not tough.
Step 4: Fold in Toasted Hazelnuts
Next, stir in the chopped toasted hazelnuts, distributing them evenly throughout the dough. These crunchy gems create a satisfying bite and complement the chocolate beautifully in every mouthful.
Step 5: Shape the Dough and Create Thumbprints
Roll the dough into 1-inch balls and space them about 2 inches apart on your prepared baking sheets. Using your thumb, gently press down in the center of each ball to create a neat indentation—that’s where the chocolate magic happens later!
Step 6: Bake and Fill with Chocolate
Bake your cookies in the preheated oven for 10 to 12 minutes or until the edges feel firm and just set. Remove the baking sheets from the oven, then fill each thumbprint indentation with chocolate chips or spoon in chocolate hazelnut spread while the cookies are still warm. Allow them to cool completely, so the chocolate sets perfectly, creating that iconic thumbprint look.
How to Serve Chocolate Hazelnut Thumbprint Cookies Recipe
Garnishes
For an extra touch of charm, try sprinkling a few finely chopped toasted hazelnuts or a light dusting of powdered sugar over the cooled cookies. These subtle garnishes enhance the rustic look and add a little more texture and sweetness.
Side Dishes
Pair these cookies with a creamy glass of cold milk, a frothy cappuccino, or even a scoop of vanilla ice cream for a dessert experience that feels indulgent without being heavy. Their rich, nutty flavor complements a variety of beverages and desserts beautifully.
Creative Ways to Present
For a festive gathering, arrange your Chocolate Hazelnut Thumbprint Cookies Recipe on a decorative platter with fresh berries and edible flowers or place them in colorful mini cupcake liners for a playful look. You can even package them in a pretty tin or cellophane bag tied with a ribbon as a thoughtful homemade gift.
Make Ahead and Storage
Storing Leftovers
Keep your cookies fresh by storing them in an airtight container at room temperature. They will stay tender and flavorful for up to a week, making it easy to enjoy their deliciousness over several days.
Freezing
You can freeze these thumbprint cookies either before or after baking. To freeze the dough, shape it into balls, place them on a tray, and freeze until solid before transferring to a zip-top bag. Baked cookies should be completely cooled before freezing in an airtight container. This way, you can enjoy freshly baked cookies anytime by simply thawing and warming them.
Reheating
For that just-baked warmth, pop a cookie or two in the microwave for about 10 to 15 seconds or warm them gently in a preheated oven at 300°F for 5 minutes. This way, the chocolate filling softens and the cookie feels freshly made, perfect for those cozy moments.
FAQs
Can I substitute other nuts for hazelnuts?
Absolutely! While hazelnuts offer a distinctive flavor and crunch, you can swap in toasted almonds, pecans, or walnuts if preferred. Just be sure to toast them lightly to bring out their best taste.
Is it possible to make these cookies gluten-free?
Yes, you can replace the all-purpose flour with a gluten-free flour blend that measures cup-for-cup. Be mindful of the blend’s ingredients to ensure a similar texture and baking behavior.
Can I use store-bought chocolate hazelnut spread instead of chocolate chips?
Definitely! Using chocolate hazelnut spread in the thumbprints creates a creamy, decadent center. Just spoon it in right after baking, while the cookie is still warm, so it sets nicely as it cools.
How do I ensure the thumbprint indentation stays during baking?
Press your thumb firmly but gently to make a pronounced indentation, and avoid pressing too deep. Chilling the dough before shaping can also help keep the shape intact during baking.
Are these cookies suitable for freezing after baking?
Yes, once the cookies have completely cooled, place them in an airtight container or freezer bag. They freeze well for up to three months and taste fresh when thawed properly.
Final Thoughts
This Chocolate Hazelnut Thumbprint Cookies Recipe is a true crowd-pleaser that brings warmth, comfort, and joyful flavors to any kitchen. Baking them is just as rewarding as enjoying every delicious bite, and I can’t wait for you to try making these at home. Trust me, once you do, they’ll become a cherished staple in your cookie repertoire, perfect for sharing with loved ones or savoring in a quiet moment just for yourself.
“`
Print
Chocolate Hazelnut Thumbprint Cookies Recipe
- Prep Time: 10 minutes
- Cook Time: 12 minutes
- Total Time: 22 minutes
- Yield: 24 cookies
- Category: Dessert
- Method: Baking
- Cuisine: American
Description
These Chocolate Hazelnut Thumbprint Cookies are rich, fudgy, and nutty treats perfect for any chocolate lover. Soft cocoa-flavored cookie dough is rolled with chopped toasted hazelnuts, baked to perfection, and then filled with melty chocolate chips or luscious chocolate hazelnut spread for an irresistible finishing touch.
Ingredients
Dry Ingredients
- 1 cup all-purpose flour
- 1/4 cup unsweetened cocoa powder
Wet Ingredients
- 1/2 cup unsalted butter, softened
- 1/4 cup granulated sugar
- 1/4 cup brown sugar, packed
- 1 egg yolk
Add-ins and Filling
- 3/4 cup toasted hazelnuts, chopped
- 1/2 cup semi-sweet chocolate chips or chocolate hazelnut spread
Instructions
- Preheat oven and prepare baking sheets: Preheat your oven to 350°F (175°C). Line two baking sheets with parchment paper to prevent sticking and ensure even baking.
- Cream butter and sugars: In a mixing bowl, cream together the softened unsalted butter, granulated sugar, and packed brown sugar until the mixture is light and fluffy, about 2-3 minutes using an electric mixer.
- Add dry ingredients: Gradually add the all-purpose flour and unsweetened cocoa powder to the creamed mixture. Mix until just combined to form a uniform cookie dough.
- Mix in hazelnuts: Fold in the chopped toasted hazelnuts evenly throughout the dough to add crunch and nutty flavor.
- Shape cookies and create indentations: Roll the dough into 1-inch diameter balls. Place them spaced about 2 inches apart on the prepared baking sheets. Press your thumb gently into the center of each dough ball creating an indentation for the filling.
- Bake the cookies: Bake the shaped cookies in the preheated oven for 10-12 minutes, until the edges feel firm but the centers are still soft.
- Add chocolate filling: Remove the cookies from the oven and immediately fill each thumbprint indentation with semi-sweet chocolate chips or spread chocolate hazelnut spread while the cookies are still warm, allowing it to melt slightly.
- Cool and serve: Allow the cookies to cool completely on the baking sheets before transferring them to a wire rack or serving plate. This will help the filling set and the cookies firm up.
Notes
- Ensure butter is softened to room temperature for easy creaming.
- Chop hazelnuts finely for better texture distribution.
- Use parchment paper for easy cookie removal and cleanup.
- For extra flavor, toast the hazelnuts lightly in a dry pan before chopping.
- Store cookies in an airtight container at room temperature for up to 5 days.
- You can substitute semi-sweet chocolate chips with your favorite chocolate spread for the filling.


