
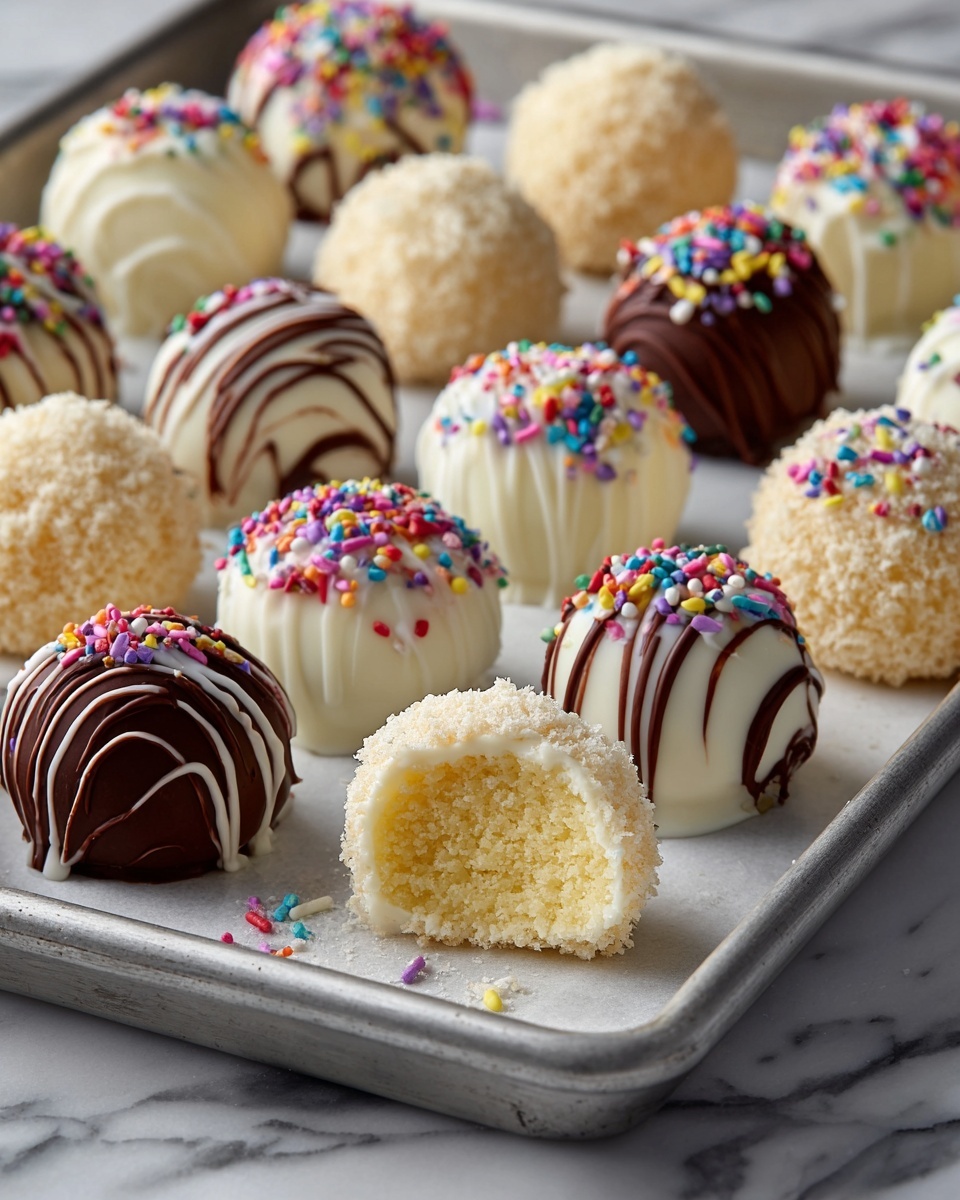
Oh, you are in for a treat with this delightful Cheesecake Balls Recipe! These bite-sized morsels pack all the creamy, tangy goodness of traditional cheesecake in a fun, easy-to-eat form that’s perfect for parties, snacks, or just indulging yourself. Whether you’re a cheesecake fanatic or looking for a simple but impressive dessert, this recipe offers a luscious, melt-in-your-mouth experience wrapped with a crumbly, inviting exterior. Get ready to make a batch that will quickly disappear because once you start, it’s hard to stop!
Ingredients You’ll Need
All the magic of this Cheesecake Balls Recipe comes from a handful of simple ingredients that combine perfectly to create irresistible flavor, texture, and a beautiful golden color from the graham cracker coating. Each one plays a crucial role in bringing balance to these sweet little bites.
- Cream Cheese, 8 oz: Softened to creamy perfection, it forms the rich base that’s smooth and luscious.
- Powdered Sugar, 1/2 cup: Adds the perfect touch of sweetness and ensures a silky texture without any graininess.
- Vanilla Extract, 1 teaspoon: Provides a warm, aromatic note that complements the tanginess of the cream cheese beautifully.
- Graham Cracker Crumbs, 1 cup: Essential for that classic cheesecake crust flavor and a lovely crunchy coating on the outside.
- Optional Toppings: Melted chocolate, crushed nuts, sprinkles, or shredded coconut – these add extra flavor, crunch, and a touch of personalization.
How to Make Cheesecake Balls Recipe
Step 1: Prepare the Cheesecake Mixture
Start by beating the softened cream cheese in a medium bowl until it’s completely smooth and creamy. Then, add the powdered sugar and vanilla extract. Mix everything together until well combined, creating a luscious cheesecake base that’s ready to be shaped into balls.
Step 2: Form the Balls
Using a small scoop or spoon, take portions of the cheesecake mixture and roll them into 1-inch balls. This size is perfect for bite-sized enjoyment. Place each ball on a parchment-lined baking sheet and pop the tray into the refrigerator for 30 minutes so the balls can firm up and hold their shape better.
Step 3: Coat the Cheesecake Balls
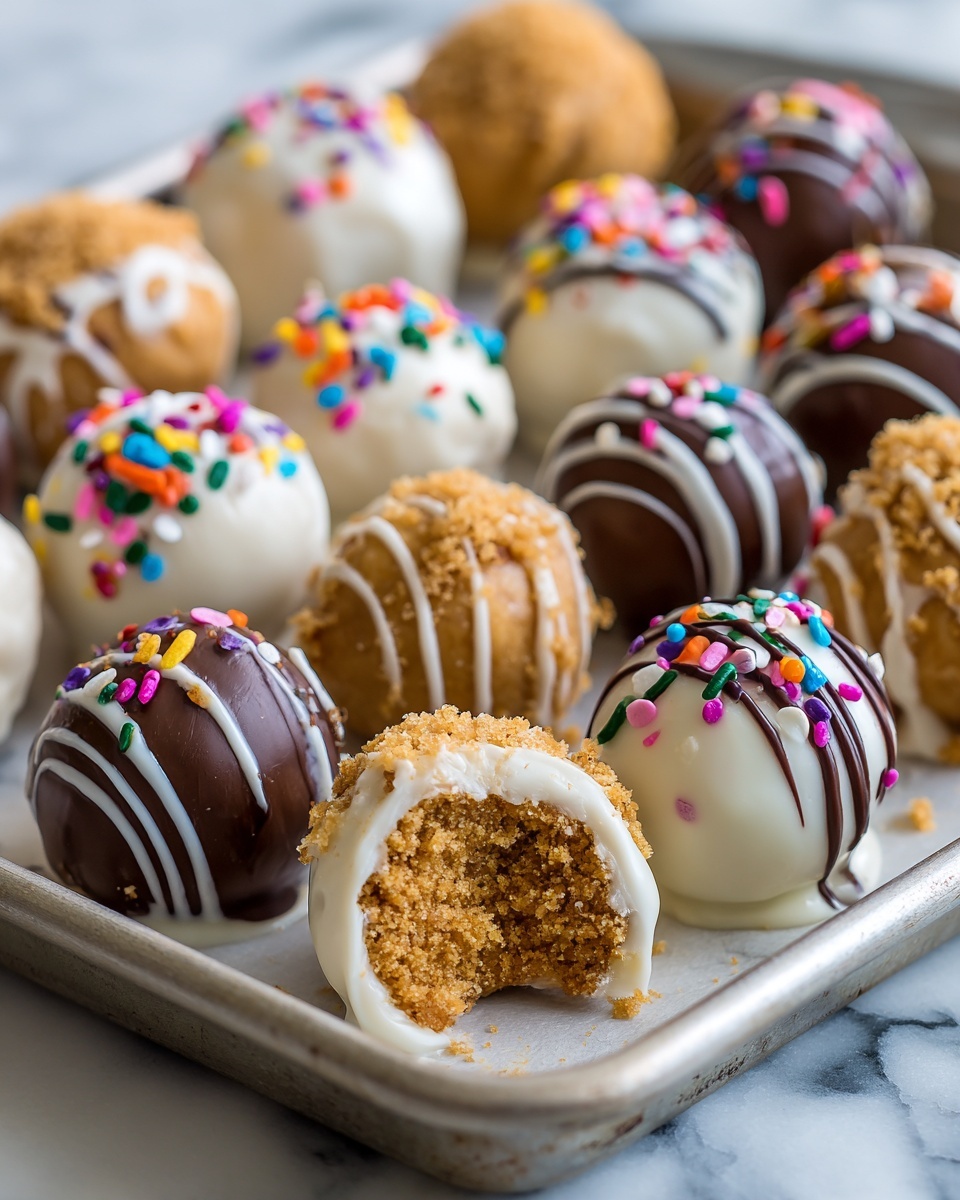
After chilling, take each cheesecake ball and roll it generously in graham cracker crumbs. This adds that signature cheesecake crust crunch. Now comes the fun part – roll or drizzle them with any of your chosen optional toppings like melted chocolate, crushed nuts, colorful sprinkles, or shredded coconut. This not only adds texture but makes them look as delightful as they taste.
Step 4: Chill and Serve
Once coated, return the cheesecake balls to the baking sheet and refrigerate again for another 30 minutes to let everything set perfectly. Serve them chilled, and watch these irresistible bites disappear in no time.
How to Serve Cheesecake Balls Recipe
Garnishes
If you want your cheesecake balls to look extra special, consider garnishing with a drizzle of dark or white chocolate, a sprinkle of finely chopped nuts, or even edible gold dust for an elegant touch. Fresh berries on the side can add a pop of color and brighten the dish beautifully.
Side Dishes
Cheesecake balls pair wonderfully with a hot cup of coffee or tea for a cozy treat. For parties, serve alongside fresh fruit platters or a light, tangy citrus salad to cut through the richness and balance the flavors effortlessly.
Creative Ways to Present
Think beyond the usual serving platter! Arrange these cheesecake balls in mini cupcake liners for convenient serving, or skewer a few on decorative sticks for an eye-catching dessert kebab. You can also create a dessert charcuterie board, mixing cheesecake balls with assorted chocolates, nuts, and fruit for an irresistible spread.
Make Ahead and Storage
Storing Leftovers
Leftover cheesecake balls can be stored in an airtight container in the refrigerator for up to 5 days. Keeping them chilled maintains their creamy texture and ensures they stay fresh and delicious, making them perfect for enjoying over several days.
Freezing
These cheesecake balls freeze exceptionally well! Place them on a baking sheet in a single layer and freeze until solid. Then transfer to a freezer-safe container or bag. They can be frozen for up to 3 months. When ready to eat, thaw them in the fridge overnight for best texture.
Reheating
Because cheesecake balls are best enjoyed cold, reheating isn’t typically recommended. If they’ve warmed up too much, just pop them back into the fridge for about 30 minutes, and they’ll regain their firm, creamy consistency swiftly.
FAQs
Can I use low-fat cream cheese for this recipe?
Yes, you can use low-fat cream cheese, but keep in mind it might affect the richness and creamy texture slightly. For the best indulgent cheesecake balls, full-fat cream cheese is ideal.
Are cheesecake balls gluten-free?
The base ingredients are gluten-free except for the graham cracker crumbs, which usually contain gluten. You can use gluten-free graham cracker crumbs or crushed gluten-free cookies to keep the recipe gluten-free.
What other coatings can I use?
Besides graham cracker crumbs and the optional toppings listed, you can try crushed cookies, finely chopped pretzels, cocoa powder, or crushed cereal for different textures and flavors.
Can I make these nut-free?
Absolutely! Simply omit any crushed nuts from the toppings. The cheesecake balls are delicious on their own or with other nut-free toppings like sprinkles or shredded coconut.
How long does it take to make Cheesecake Balls Recipe from start to finish?
The entire process takes about 1 hour and 10 minutes, including chilling times. Most of that is hands-off chilling, making it a convenient dessert to prepare ahead.
Final Thoughts
There’s something truly special about these little cheesecake delights. This Cheesecake Balls Recipe is a charming way to enjoy all that creamy cheesecake flavor without any fuss, in an adorable, bite-sized form. Whether it’s for a party, a sweet snack, or a festive treat, these will quickly become a favorite in your dessert rotation. Give them a try—you’ll be hooked from the very first bite!
Print
Cheesecake Balls Recipe
- Prep Time: 15 minutes
- Cook Time: 0 minutes
- Total Time: 1 hour 10 minutes
- Yield: 15 servings
- Category: Dessert
- Method: No-Cook
- Cuisine: American
- Diet: Vegetarian
Description
Delicious and creamy cheesecake balls made from smooth cream cheese, powdered sugar, and vanilla, coated in graham cracker crumbs and optionally decorated with various toppings. Perfect bite-sized treats that are easy to prepare and great for parties or dessert platters.
Ingredients
Cheesecake Mixture
- 8 oz cream cheese, softened
- 1/2 cup powdered sugar
- 1 teaspoon vanilla extract
Coating and Toppings
- 1 cup graham cracker crumbs
- Optional toppings: melted chocolate, crushed nuts, sprinkles, shredded coconut
Instructions
- Prepare the Cheesecake Mixture: In a medium bowl, beat the softened cream cheese until it becomes smooth and creamy. Then add the powdered sugar and vanilla extract, mixing thoroughly until well combined into a rich and creamy mixture.
- Form the Balls: Using a small scoop or spoon, shape the cream cheese mixture into 1-inch diameter balls. Place these balls on a parchment-lined baking sheet. Refrigerate the balls for 30 minutes so they firm up and become easier to handle for coating.
- Coat the Cheesecake Balls: Roll each chilled cheesecake ball in the graham cracker crumbs until evenly coated. For additional flavor and texture, dip or sprinkle the balls with any optional toppings like melted chocolate, crushed nuts, sprinkles, or shredded coconut.
- Chill and Serve: Place the coated cheesecake balls back onto the parchment-lined baking sheet and refrigerate them for another 30 minutes or until they are firm. Serve these chilled for a cool, delightful treat.
Notes
- Ensure the cream cheese is softened at room temperature for easier mixing and smoother texture.
- You can customize the toppings to suit your preference or occasion.
- Store leftover cheesecake balls covered in the refrigerator and consume within 3-4 days for best freshness.
- If desired, freeze the balls for longer storage and thaw in the fridge before serving.


