
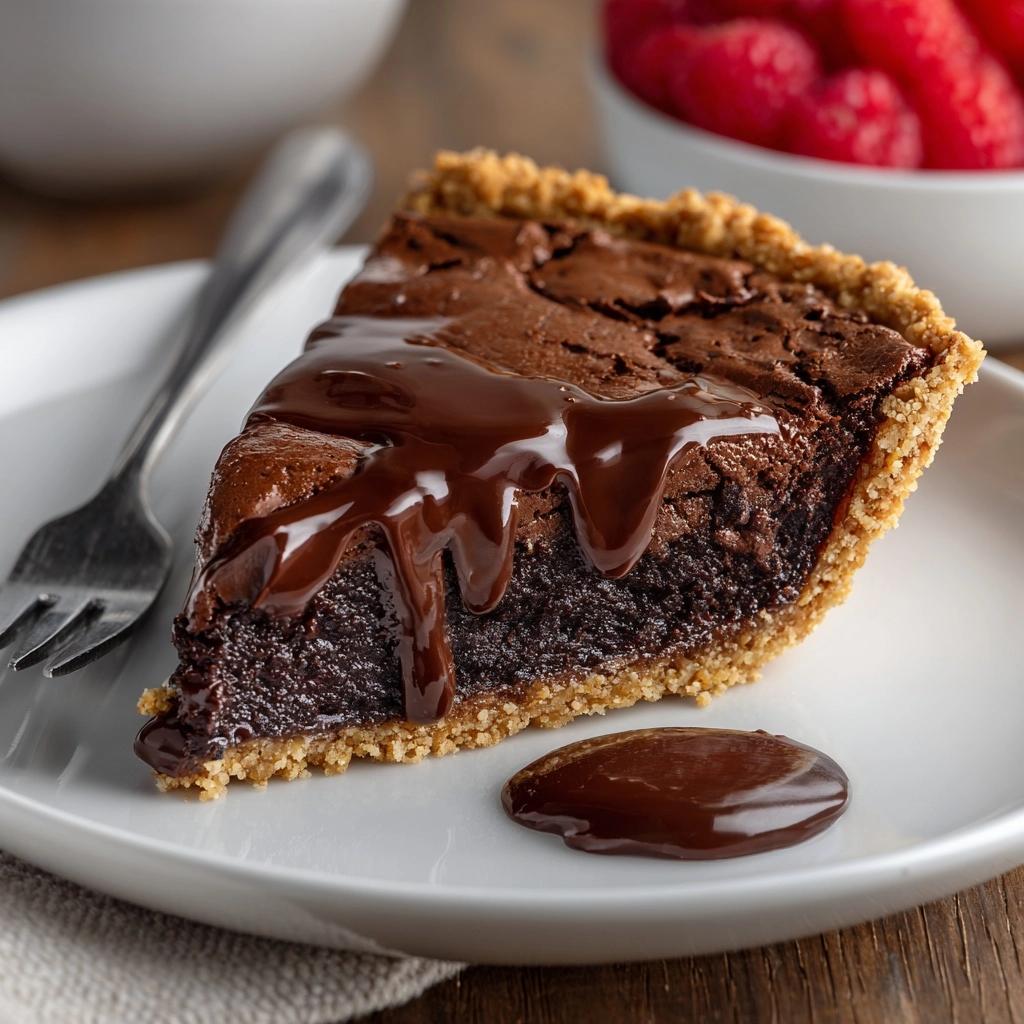
If you’re a chocolate lover with a soft spot for comforting, crowd-pleasing desserts, then Gooey Brownie Pie is about to become your new obsession. Imagine the rich, fudgy soul of a brownie nestled in a buttery pie crust, baked just until the edges are set but the center stays irresistibly gooey. This dessert brings together the best of both worlds: the classic nostalgia of brownies with the elegance of a sliceable pie. It’s easy enough for a weeknight treat yet impressive enough to steal the show at any gathering—trust me, you’ll want a second slice as soon as you finish your first!
Ingredients You’ll Need
This recipe calls for simple pantry staples, but each one plays a starring role in creating the signature texture and flavor of Gooey Brownie Pie. Here’s how every ingredient makes a difference in the final result:
- Unsalted butter (1/2 cup, melted): Gives the brownie filling its rich flavor and melt-in-your-mouth texture—don’t skip the real thing!
- Granulated sugar (1 cup): Sweetens and helps create that crackly brownie top we all love.
- Large eggs (2): Bind everything together and add to the decadent, fudgy consistency.
- Vanilla extract (1 teaspoon): Rounds out the chocolate flavor and adds warmth.
- Unsweetened cocoa powder (1/3 cup): Delivers deep chocolate flavor—use the best quality you can find.
- All-purpose flour (1/2 cup): Just enough to set the pie without making it cakey.
- Salt (1/4 teaspoon): Balances the sweetness and intensifies the chocolate notes.
- Baking powder (1/4 teaspoon): Lifts the brownie slightly so it isn’t too dense.
- Semi-sweet chocolate chips (1/2 cup): Extra bursts of melty chocolate in every bite.
- Pre-made or homemade 9-inch pie crust (unbaked): The cozy shell that holds it all together—try different crusts for a twist!
- Optional toppings: Ice cream, whipped cream, or chocolate sauce for over-the-top indulgence.
How to Make Gooey Brownie Pie
Step 1: Preheat the Oven
Start by preheating your oven to 350°F (175°C). This ensures an even bake from the moment your Gooey Brownie Pie goes in. A properly preheated oven is key for that perfect balance between a set crust and a gooey center.
Step 2: Mix Butter and Sugar
In a large mixing bowl, whisk together the melted butter and sugar until the mixture is smooth and shiny. This step sets the stage for that signature crackly brownie top and ensures the sugar dissolves nicely for a silky texture.
Step 3: Add Eggs and Vanilla
Add the eggs and vanilla extract to the bowl. Whisk until everything is beautifully combined, and the mixture looks a little lighter in color. This is where your filling starts to take on that luscious, fudgy body we all crave in Gooey Brownie Pie.
Step 4: Incorporate Dry Ingredients
Stir in the cocoa powder, flour, salt, and baking powder. Mix just until everything is combined—don’t overdo it! Overmixing can make the pie tough instead of gooey. The goal is a thick, chocolatey batter that’s still pourable.
Step 5: Fold in Chocolate Chips
Gently fold in the semi-sweet chocolate chips. These little pockets of melty chocolate will make every bite of your Gooey Brownie Pie extra decadent. If you love texture, you could even add a handful of chopped nuts at this stage.
Step 6: Assemble and Bake
Pour the brownie batter into your unbaked pie crust, using a spatula to smooth the top. Pop the pie into the oven and bake for 30 to 35 minutes. You want the edges to be set and the center to remain just a bit wobbly—this is the secret to that gooey middle!
Step 7: Cool and Serve
Let the pie cool for at least 15 minutes before slicing. This gives the center time to settle and become even more luscious. Serve warm (highly recommended!) with a scoop of vanilla ice cream, a dollop of whipped cream, or a generous drizzle of chocolate sauce. Pure bliss.
How to Serve Gooey Brownie Pie

Garnishes
Dress up your Gooey Brownie Pie with a simple scoop of vanilla ice cream, a swirl of whipped cream, or a few fresh berries. Chocolate sauce or caramel drizzle takes it over the top for true chocoholics. Even a sprinkle of flaky sea salt can add a gourmet touch.
Side Dishes
This rich dessert pairs beautifully with a tall glass of cold milk, a mug of coffee, or a shot of espresso. If you’re serving Gooey Brownie Pie after a big meal, consider offering some fresh fruit or a light salad alongside to balance out the decadence.
Creative Ways to Present
Try cutting the pie into small wedges and serving on a platter for a party, or bake individual mini Gooey Brownie Pies in tart pans for a charming twist. You can even layer slices in parfait glasses with whipped cream and berries for a playful, deconstructed dessert.
Make Ahead and Storage
Storing Leftovers
To keep your Gooey Brownie Pie fresh, cover leftovers tightly with foil or plastic wrap and store at room temperature for up to 2 days. The texture stays wonderfully soft and fudgy, making it just as delicious for a midnight snack!
Freezing
You can absolutely freeze Gooey Brownie Pie for longer storage. Wrap individual slices or the entire pie tightly in plastic wrap, then foil, and freeze for up to 2 months. Thaw overnight in the refrigerator before serving for best results.
Reheating
If you love a warm, melty center, pop a slice in the microwave for 10-15 seconds or reheat in a 300°F oven for about 10 minutes. This brings back that irresistible gooeyness, making leftovers taste freshly baked.
FAQs
Can I use a different type Dessert
Definitely! While a classic pastry crust is delicious, feel free to experiment with graham cracker or Oreo crusts for a fun twist. Each crust changes the flavor profile and adds its own character to Gooey Brownie Pie.
What’s the best way to know when the pie is done?
Look for set edges and a center that’s just slightly wobbly if you gently shake the pan. The pie will continue to firm up as it cools, ensuring the perfect gooey texture when you slice in.
Can I make Gooey Brownie Pie gluten-free?
Yes! Swap in your favorite 1:1 gluten-free flour blend for the all-purpose flour. Be sure your pie crust is gluten-free as well, and you’ll have a delicious, fudgy pie everyone can enjoy.
Can I add mix-ins like nuts or caramel?
Absolutely! Chopped walnuts, pecans, or a swirl of caramel sauce can take your Gooey Brownie Pie to new heights. Fold them in with the chocolate chips for a custom touch.
How long does Gooey Brownie Pie keep?
Stored properly, the pie will stay fresh for up to 2 days at room temperature or up to 5 days in the refrigerator. For longer storage, freezing is a great option.
Final Thoughts
There’s something magical about a dessert that manages to be both nostalgic and show-stopping, and Gooey Brownie Pie fits that bill perfectly. If you’re craving a treat that’s sure to delight everyone at the table, don’t wait—gather your ingredients and bake up a slice of chocolate heaven tonight!
Print
Gooey Brownie Pie Recipe
- Prep Time: 10 minutes
- Cook Time: 35 minutes
- Total Time: 45 minutes
- Yield: 8 slices
- Category: Dessert
- Method: Baking
- Cuisine: American
- Diet: Vegetarian
Description
This Gooey Brownie Pie is a delightful fusion of rich, fudgy brownie batter baked inside a flaky pie crust. Perfectly gooey in the center with a crackly top, it makes an irresistible dessert. Serve it warm with ice cream or chocolate sauce for a scrumptious treat that’s easy to make yet wonderfully indulgent.
Ingredients
Pie Crust
- 1 pre-made or homemade 9-inch pie crust (unbaked)
Brownie Filling
- 1/2 cup unsalted butter (melted)
- 1 cup granulated sugar
- 2 large eggs
- 1 teaspoon vanilla extract
- 1/3 cup unsweetened cocoa powder
- 1/2 cup all-purpose flour
- 1/4 teaspoon salt
- 1/4 teaspoon baking powder
- 1/2 cup semi-sweet chocolate chips
Optional Toppings
- Vanilla ice cream
- Whipped cream
- Chocolate sauce
Instructions
- Preheat Oven: Preheat your oven to 350°F (175°C) to prepare for baking the brownie pie.
- Mix Butter and Sugar: In a large mixing bowl, whisk together the melted butter and granulated sugar until the mixture is smooth and well combined.
- Add Eggs and Vanilla: Crack in the eggs and pour in the vanilla extract. Whisk thoroughly until the batter is smooth and uniform in texture.
- Incorporate Dry Ingredients: Stir in the unsweetened cocoa powder, all-purpose flour, salt, and baking powder just until all the ingredients are combined, taking care not to overmix to maintain a tender crumb.
- Fold in Chocolate Chips: Gently fold the semi-sweet chocolate chips into the batter to evenly distribute delightful pockets of melted chocolate throughout the pie.
- Fill Pie Crust: Pour the prepared brownie batter into the unbaked pie crust. Use a spatula to smooth the top evenly.
- Bake: Place the pie into the preheated oven and bake for 30 to 35 minutes. The pie is done when the center is set but still slightly gooey, ensuring a fudgy texture.
- Cool and Serve: Allow the pie to cool for at least 15 minutes to let it set. Serve warm with optional toppings like a scoop of vanilla ice cream, whipped cream, or a drizzle of chocolate sauce for extra indulgence.
Notes
- For an extra fudgy texture, underbake the pie slightly and allow it to finish setting as it cools.
- Try a graham cracker or Oreo crust for a delicious twist on the traditional pie crust.
- Store any leftovers covered at room temperature for up to 2 days to maintain freshness.
Nutrition
- Serving Size: 1 slice
- Calories: 360
- Sugar: 27g
- Sodium: 150mg
- Fat: 20g
- Saturated Fat: 11g
- Unsaturated Fat: 8g
- Trans Fat: 0g
- Carbohydrates: 42g
- Fiber: 2g
- Protein: 4g
- Cholesterol: 60mg


