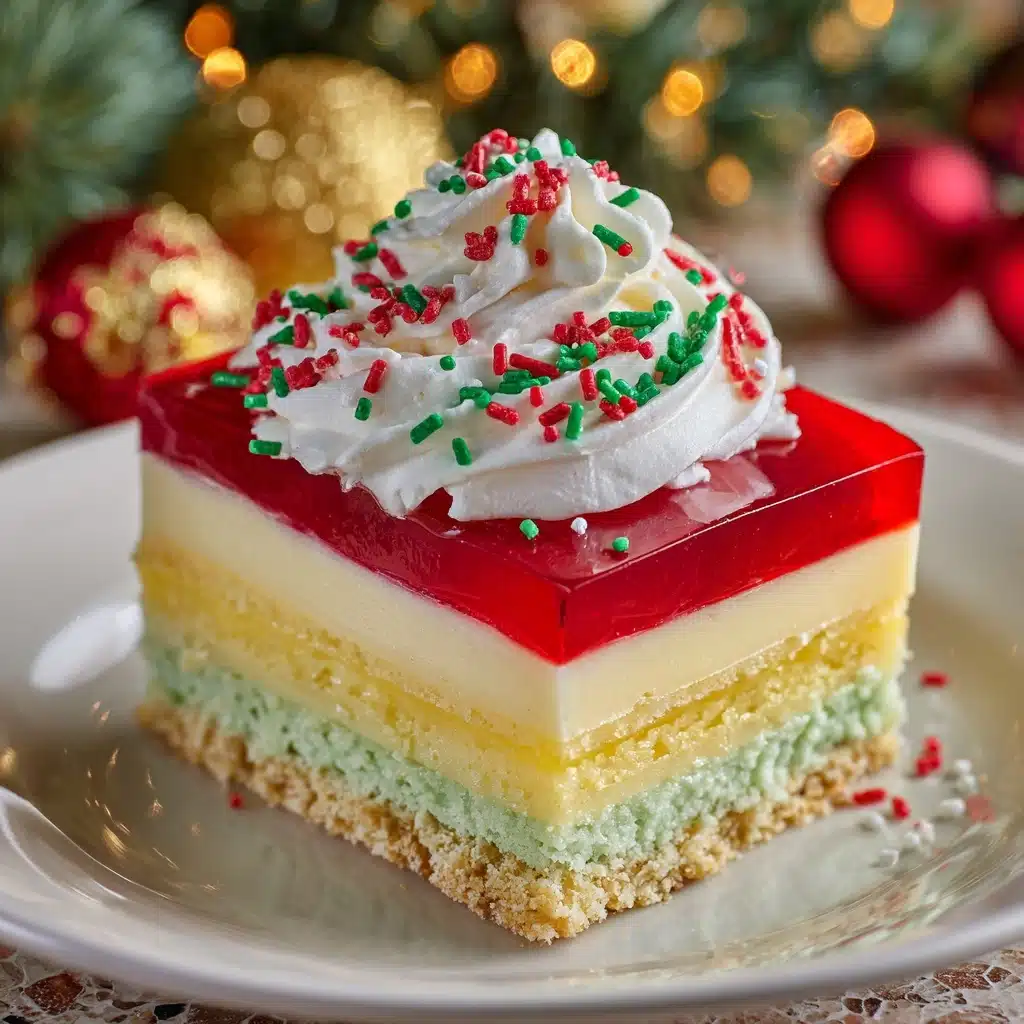
This Holiday-Inspired Poke Cake is the ultimate showstopper at any festive gathering, instantly brightening dessert tables with bursts of vibrant red and green pudding tucked inside a fluffy, moist cake. It comes together with ease, blending classic flavors and playful colors to create a centerpiece dessert that’s as fun to make as it is to eat. Rich whipped topping and a snowy layer of sprinkles make each bite feel like a celebration, ensuring everyone—kids and adults alike—comes back for seconds. If you’re looking for something both effortless and exciting, this cake is a true holiday miracle!
Ingredients You’ll Need
Holiday-Inspired Poke Cake uses everyday staples that combine to make something magical—each one plays its part, from the pillowy cake to the creamy, colorful pudding and cloud-like whipped topping. Here’s what you’ll need, along with a few tips to make each ingredient count.
- White or yellow cake mix: The perfect canvas for vibrant holiday colors and flavors—choose your favorite brand and bake it according to the box instructions.
- Eggs, oil, and water (for cake mix): These mix-ins create a soft, moist cake base, so use fresh eggs and a neutral oil for the best texture.
- Instant vanilla or white chocolate pudding mix: This transforms basic poke cake into a creamy, dreamy dessert—the instant variety sets quickly and holds its shape.
- Milk: For luscious, rich pudding, whole or 2% milk gives the best consistency, but you can swap in your favorite dairy or plant milk if needed.
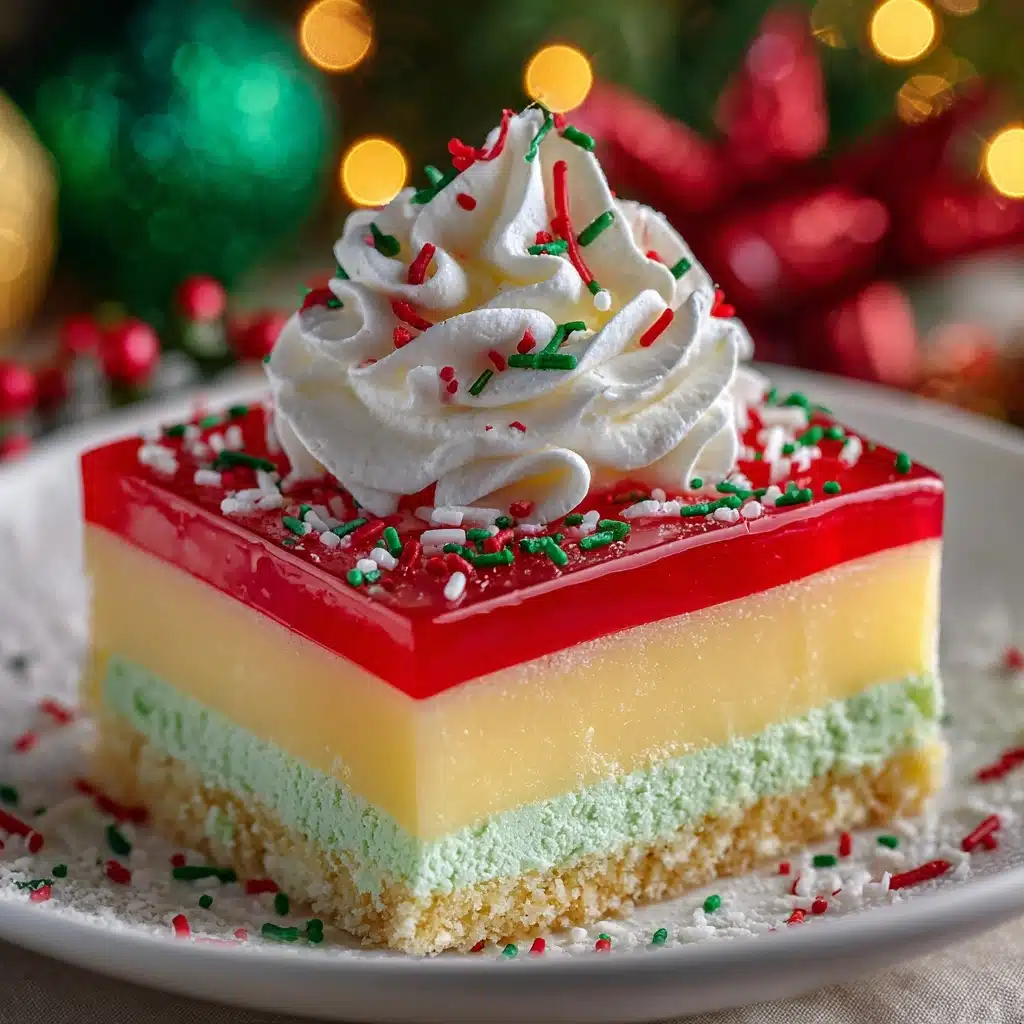
- Red and green food coloring: Go bold with gel or liquid dyes to create vivid swirls of festive color inside and atop the cake.
- Whipped topping (like Cool Whip): The classic, pillowy finish—always thaw before spreading for effortless swoops and smooth frosting.
- Holiday sprinkles: Add a final touch of whimsy and crunch—pick shapes and colors that match your festivities for full holiday flair.
How to Make Holiday-Inspired Poke Cake
Step 1: Bake the Cake
Get started by mixing up your cake batter according to the box instructions, adding eggs, oil, and water as directed. Pour the batter into a greased 9×13-inch pan and bake until golden and a toothpick poked into the center comes out clean. Let the cake cool for 10 to 15 minutes—just enough so it’s still slightly warm, but not hot, to help those colorful puddings soak in perfectly.
Step 2: Poke the Holes
While the cake is cooling, grab the handle of a wooden spoon (or something similar in size) and gently poke holes all over the cake, about an inch apart. Don’t be shy—you want lots of space for the pudding to settle in, giving every slice its fair share of festive fun!
Step 3: Make and Color the Pudding
In a medium bowl, whisk together the instant pudding mix and cold milk until it’s smooth and beginning to thicken—this only takes about 2 minutes. Split the pudding evenly into two bowls. Add red food coloring to one bowl and green to the other, stirring until you reach your desired shades of holiday cheer. The more vibrant, the merrier!
Step 4: Fill the Cake with Color
Now comes the fun part: use a spoon or small measuring cup to fill the holes in the cake, alternating between red and green pudding to create a cheerful, patchwork effect. When all the holes are filled, gently spread any extra pudding across the top of the cake for extra color and flavor. You want every bite to have that signature holiday look.
Step 5: Chill and Set
Cover your masterpiece with plastic wrap or foil and refrigerate for at least 1 hour. This step lets the pudding firm up inside the cake, making those pockets of color stand out beautifully when sliced. Plus, chilling helps all the flavors meld and gives the cake its super-refreshing, creamy finish.
Step 6: Top and Decorate
Once the pudding has set, spread the whipped topping evenly over the entire cake in gentle, cloud-like waves. Finish with a generous scattering of holiday sprinkles, letting them pop against the white topping for ultimate festive flair. It’s almost too pretty to eat—almost!
How to Serve Holiday-Inspired Poke Cake
Garnishes
A classic holiday-inspired poke cake loves a little extra sparkle. Festive sprinkles are a must, but you could also add edible glitter, crushed peppermint candies, or chocolate shavings for an extra-special touch. If you want to make each serving unique, top with a maraschino cherry or a dollop of colored whipped cream just before serving.
Side Dishes
This sweet treat stands beautifully on its own, but it’s also delightful alongside a cup of hot cocoa or spiced tea. For a more elaborate dessert spread, set out bowls of mixed berries, vanilla ice cream, or a small fruit salad—light, bright accompaniments that keep things festive without overwhelming the palate.
Creative Ways to Present
Serve slices on colorful holiday plates or in small glass dessert cups for single-serve fun. For a party, cut the cake into small squares and arrange them on a tiered cake stand, alternating pieces to show off the brilliant red and green. Or, make a poke cake trifle by layering chunks of cake, colored pudding, and whipped topping in a giant glass bowl for the ultimate table centerpiece.
Make Ahead and Storage
Storing Leftovers
Holiday-Inspired Poke Cake keeps beautifully in the fridge for up to four days. Cover the pan tightly with plastic wrap or foil to prevent the cake from drying out and absorbing fridge odors. The whipped topping helps lock in moisture, so each slice stays as luscious as when you first made it.
Freezing
If you want to get a head start on holiday prep, you can freeze the cake (without whipped topping and sprinkles). Wrap the cooled, poke-filled cake in several layers of plastic wrap and freeze for up to one month. When you’re ready to serve, thaw in the fridge overnight, then add the whipped topping and sprinkles just before serving for the freshest texture and look.
Reheating
There’s no need to reheat Holiday-Inspired Poke Cake, as it’s best served chilled, which makes it even more convenient for busy holiday gatherings. If you prefer the cake at room temperature, simply let it sit out for about 30 minutes before slicing and serving.
FAQs
Can I use different pudding flavors?
Absolutely! Swap in chocolate, butterscotch, or even pistachio pudding based on your holiday theme or family favorites. Just remember that super-dark colors might not pop as brightly as vanilla or white chocolate when tinted.
What’s the best way to get even pudding distribution?
Poke the holes about one inch apart and make sure they go about three-quarters of the way through the cake. Pour slowly, using a spoon to guide the colored pudding into each hole, and spread any excess over the top for consistent flavor in every bite.
Can I make Holiday-Inspired Poke Cake with homemade cake and whipped cream?
You sure can! A from-scratch white or yellow cake works beautifully, and freshly whipped cream (sweetened and stabilized) makes a lovely stand-in for whipped topping—just keep in mind it’s a bit less sturdy, so add it just before serving.
Are there gluten-free or dairy-free options?
Yes! Use your favorite gluten-free cake mix and instant pudding that’s labeled gluten-free, and opt for dairy-free milk and whipped topping. You’ll still get all the fun and festivity without the allergens.
Can I adjust the colors for other occasions?
Absolutely—this recipe is a blank canvas! Try pastels for spring, oranges and purples for Halloween, or red and blue for patriotic celebrations. The beauty of the Holiday-Inspired Poke Cake is in its endless flexibility and eye-popping presentation.
Final Thoughts
If you’re searching for a crowd-pleasing dessert that’s both playful and delicious, you simply can’t go wrong with Holiday-Inspired Poke Cake. It’s so easy to make and sure to be the highlight of any celebration. Give it a try this season—you’ll love seeing smiles with every slice!